How do they work?
Get to know how you can start using the Publish Event feature
So, you’ve heard about the Publish Event feature and you’re curious how it works.
At its core, the Publish Event feature revolves around Q-Flow Event Registry. Let’s dive in and walk through the first step: creating a Category.
Create your first Category
A Category is a logical grouping that Event Types can be associated with one another. There is no rules or limitation on category groupings, but to aid subscribers, the categories should have logical grouping. For example, all Events pertaining to a customer could be conveniently grouped together. Or all Transactional events can be grouped together.
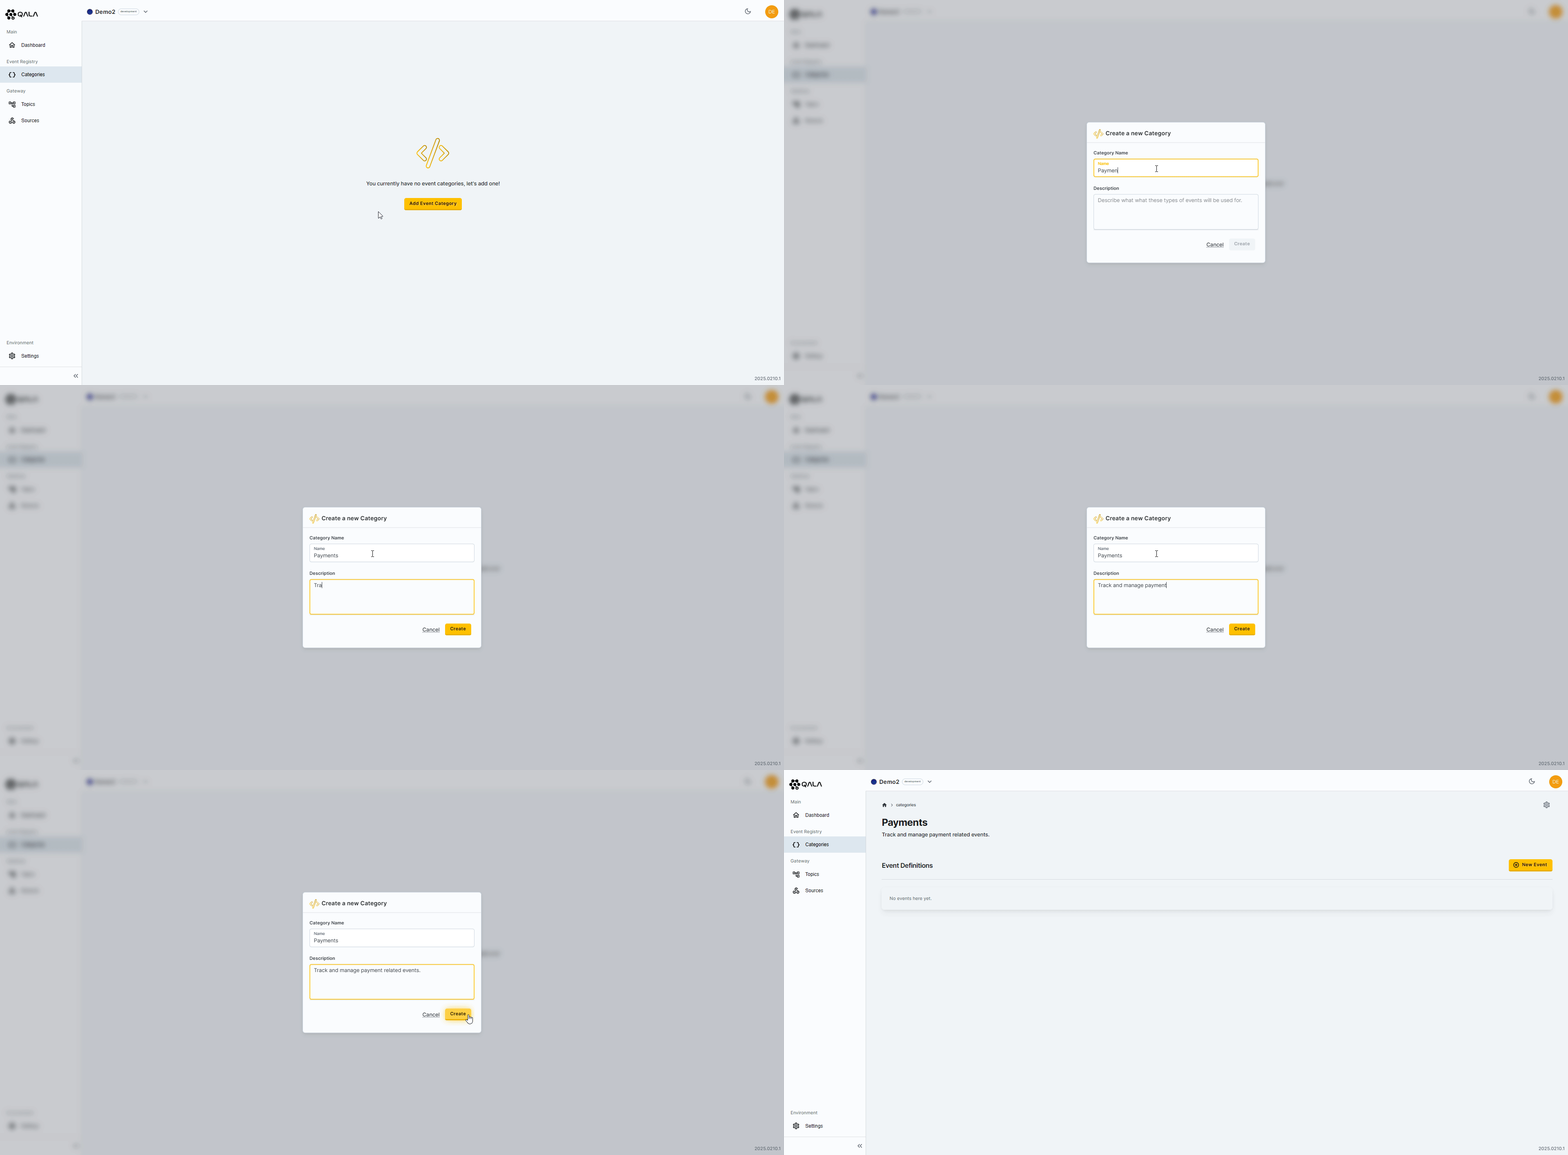
To create a Category:
- Open the Management Portal.
- Select
Categoriesin the left sidebar menu. - Press the
Add Event Categorybutton. - Give the Category a unique name.
- Add a description for the Category.
- Press the
Createbutton.
Create the Event Type
Now that you have successfully created your first Category, let's add an Event Type to it.
An Event Type in webhooks specifies the kind of event that triggers the webhook. It defines the particular action or occurrence, such as "customer.created" or "order.completed," that initiates the webhook call.
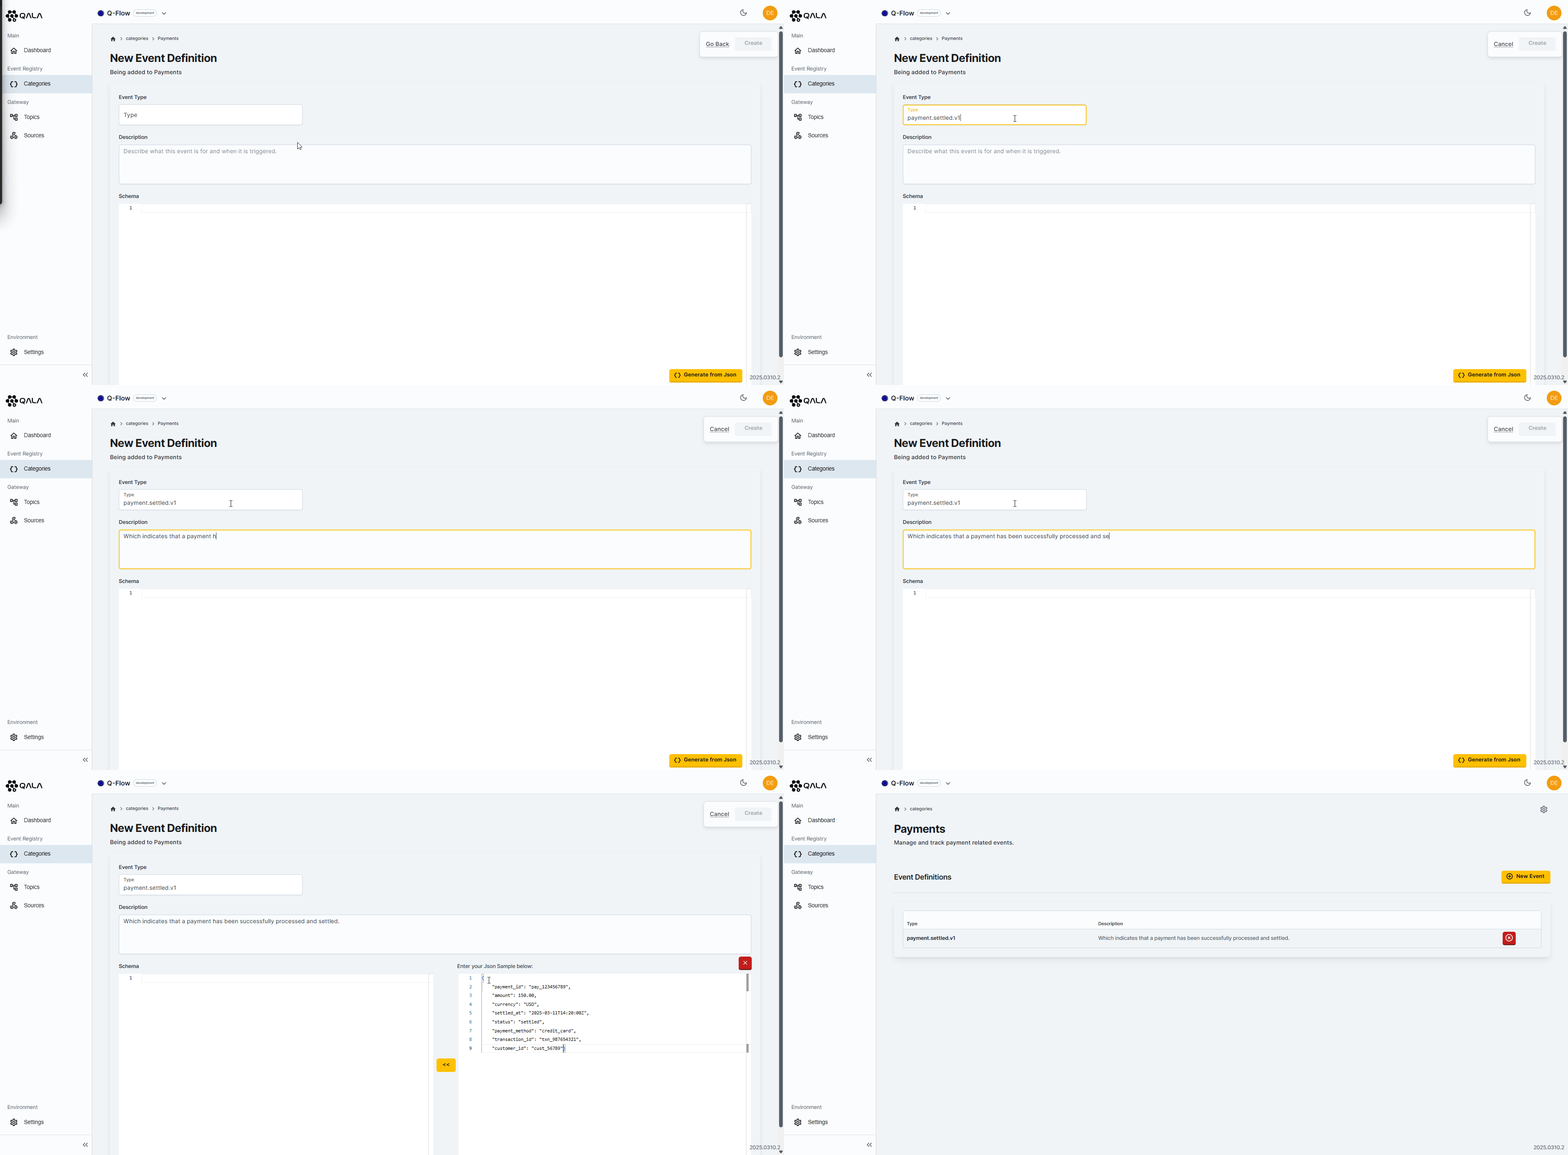
To create an Event Type for the newly created Category:
- Be sure to be inside the newly created Category.
- Press the
New Eventbutton. - Name the Event Type.
- Add a brief description to the Event Type.
- Define the schema of the Event Type or allow Qala to generate the JSON schema for you conveniently.
- Press the
Createbutton.
Upon the creation of the Event Type, we recommend:
- Naming the Event Type with a noun followed by a verb clearly indicates what entity is affected and what action occurred, enhancing readability and understanding. For example, "customer.created" specifies that a customer was created.
- To remove any ambiguity for the Event Type, you can add a brief description denoting what the Event Type is for and when the event is triggered.
- On the schema definition, you can simply copy an existing schema, ensuring it conforms to JSON schema standards or allow Qala to generate the JSON schema for you conveniently.
Import OpenAPI specifications
If your OpenAPI specification includes defined events, you can upload your YAML file directly to Q-Flow. Qala will automatically create Event Types and generate Categories based on the noun naming convention used in your spec. We support both OpenAPI 3.0 (x-webhooks) and 3.1 (webhooks) formats.
During import, Qala extracts and applies the event name, description, and schema to each Event Type. Event Types will be appended to existing Categories where applicable. If a referenced Category doesn't already exist, it will be created automatically and associated with the relevant Event Types.
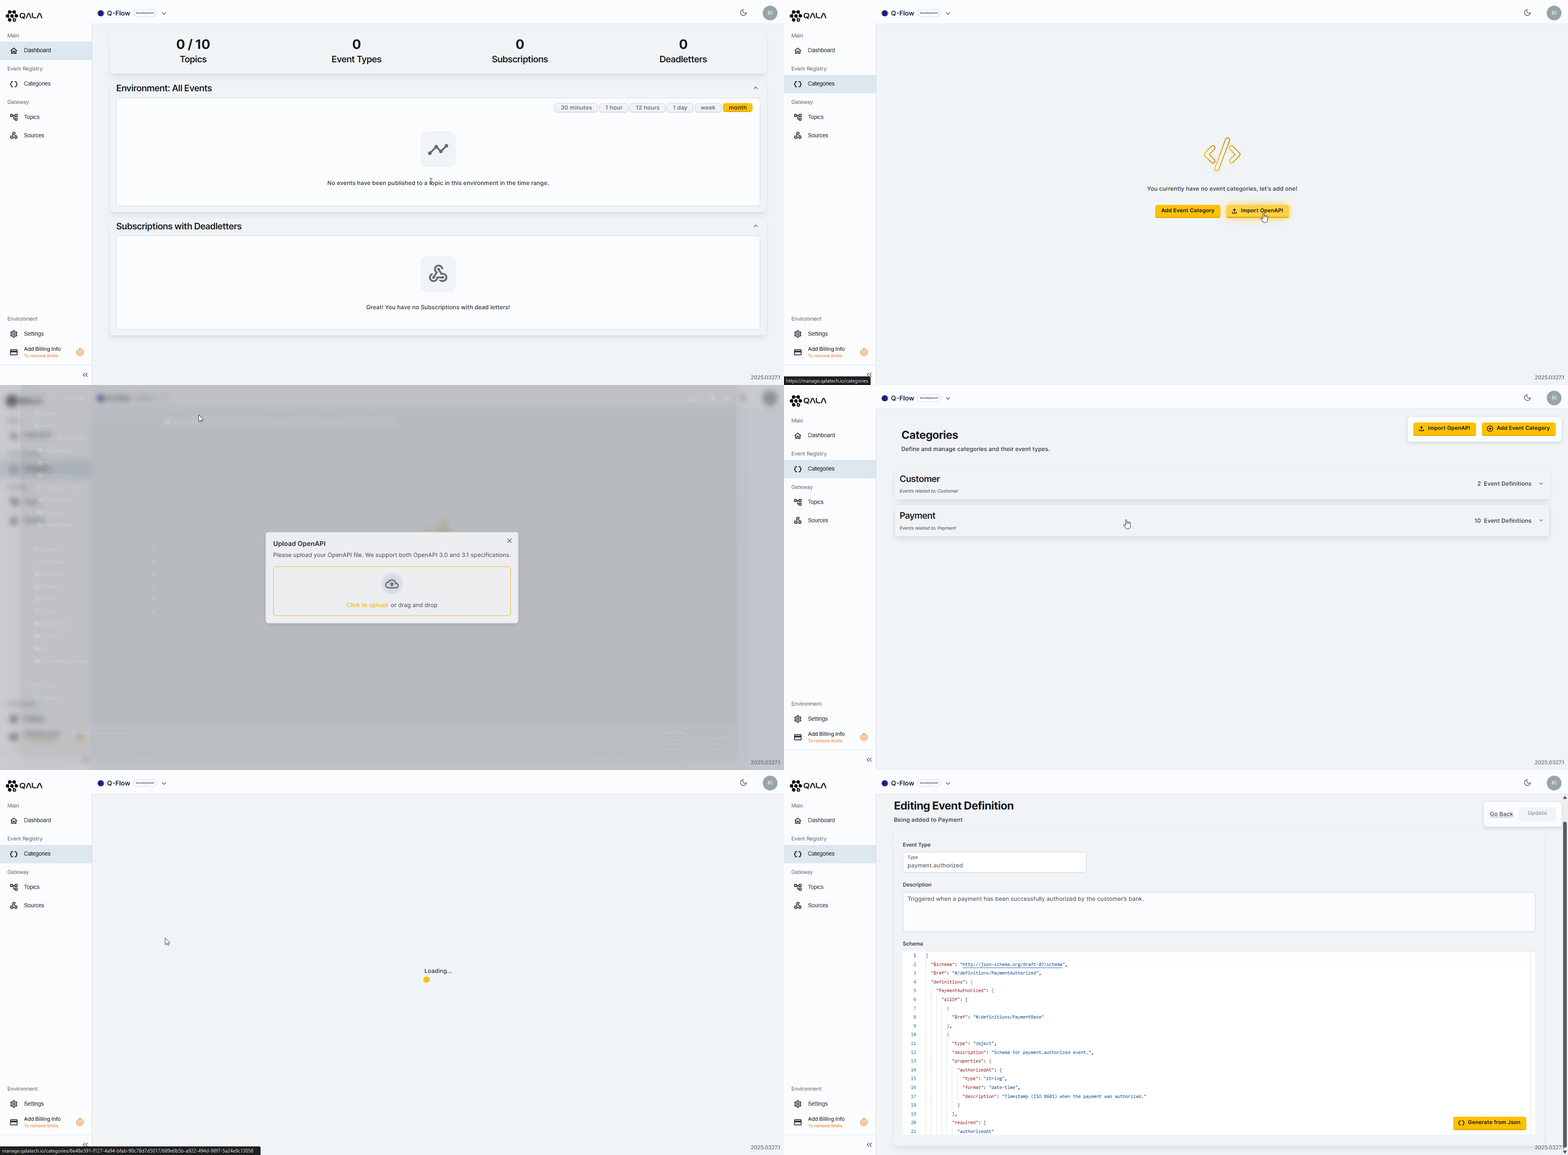
To import OpenAPI specifications:
- Press the
Import OpenAPIbutton. - Drag and drop, or upload a valid OpenAPI specification file from your computer.
Re-importing an existing Event Type will overwrite its description and schema. If the changes are breaking, be sure to communicate them clearly to your Subscribers. Whenever possible, use versioning to manage breaking changes and ensure a smooth transition.
Create your first Topic
Now, let's move forward and create a Topic within your Environment:
A Topic is a specific subject or category of events that can be subscribed to. It groups related event types, allowing subscribers to listen for and respond to relevant events within that Topic.
A Topic could represent a specific subject, multiple categories or be limited to specific circumstances, like an individual company/tenant. Topics ensure that subscribers are only notified about events that pertain to their specific interests or functions, reducing unnecessary data processing or regulatory concerns.
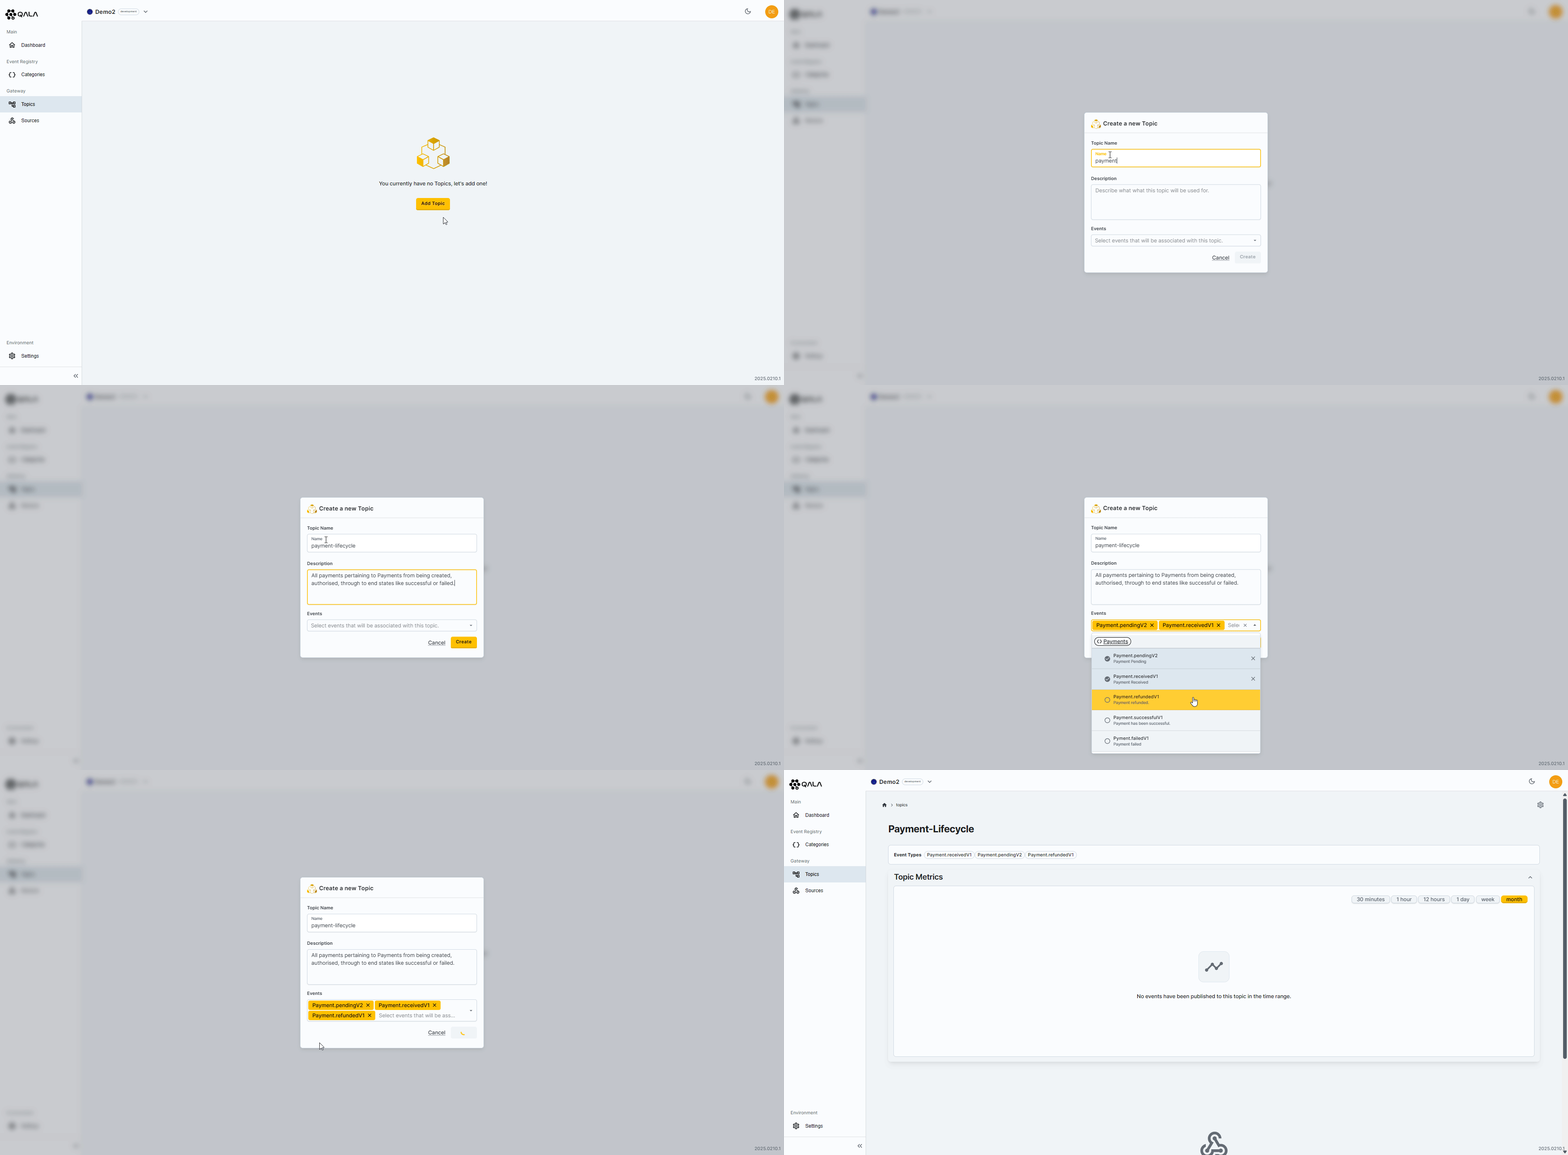
To create a Topic:
- Open the Management Portal.
- Select
Topicsin the left sidebar menu. - Press the
Add new Topicbutton. - Give the Topic a unique name.
- Add a description to the Topic.
- Select the applicable event types for the Topic. A drop-down list will show you the event type created within the Registry, grouped by the associated category.
- Press the
Createbutton.
Create your first Subscription
Create a Subscription for your newly created Topic.
A Subscription for a Topic in webhooks, is a request by a client (subscriber) to receive notifications for events related to a specific Topic. It involves registering a webhook URL to listen for and handle events filtered for that Subscription.
A Topic can have one or many Subscriptions, allowing multiple webhook URLs to listen out for specific events for the Topic.
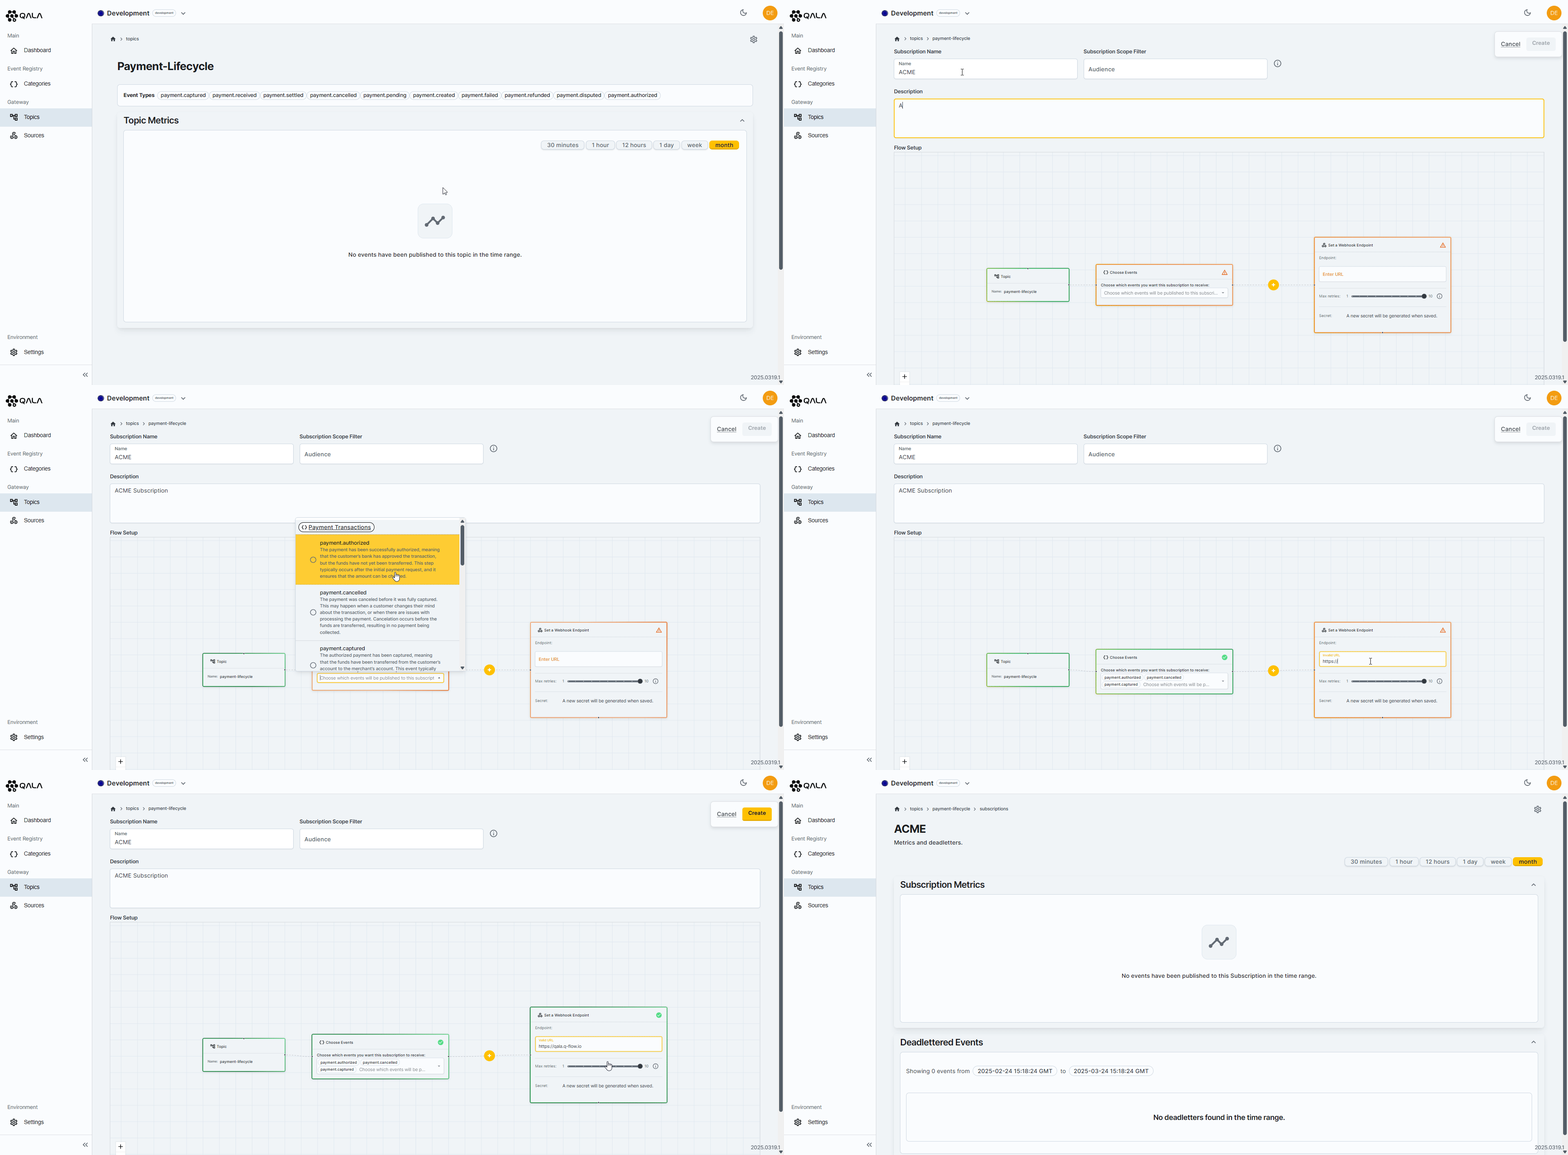
- Be sure to be inside the newly created Topic.
- Press the
Add Subscriptionbutton. - Give the Subscription a unique name.
- If applicable, you can assign an Audience value for the Subscription Scope Filter.
- Add a description for the Subscription.
- Choose the events that the Subscription wants to subscribe to.
- If applicable, you can choose to apply advanced filtering, aggregation and transformation to incoming events.
- Set a webhook endpoint URL.
- Configure the maximum retries for the webhook.
- Press the
Createbutton. - Once the Subscription has been created, you can view the Subscription Webhook Secret.
Publish Events to your Topic
In order to publish an Event to your Topic, you’ll need a Secret Key (check the Create an API Key section), along with the Environment ID.
The Environment ID can be conveniently accessed and copied to your clipboard by clicking the environment name on the top menu.
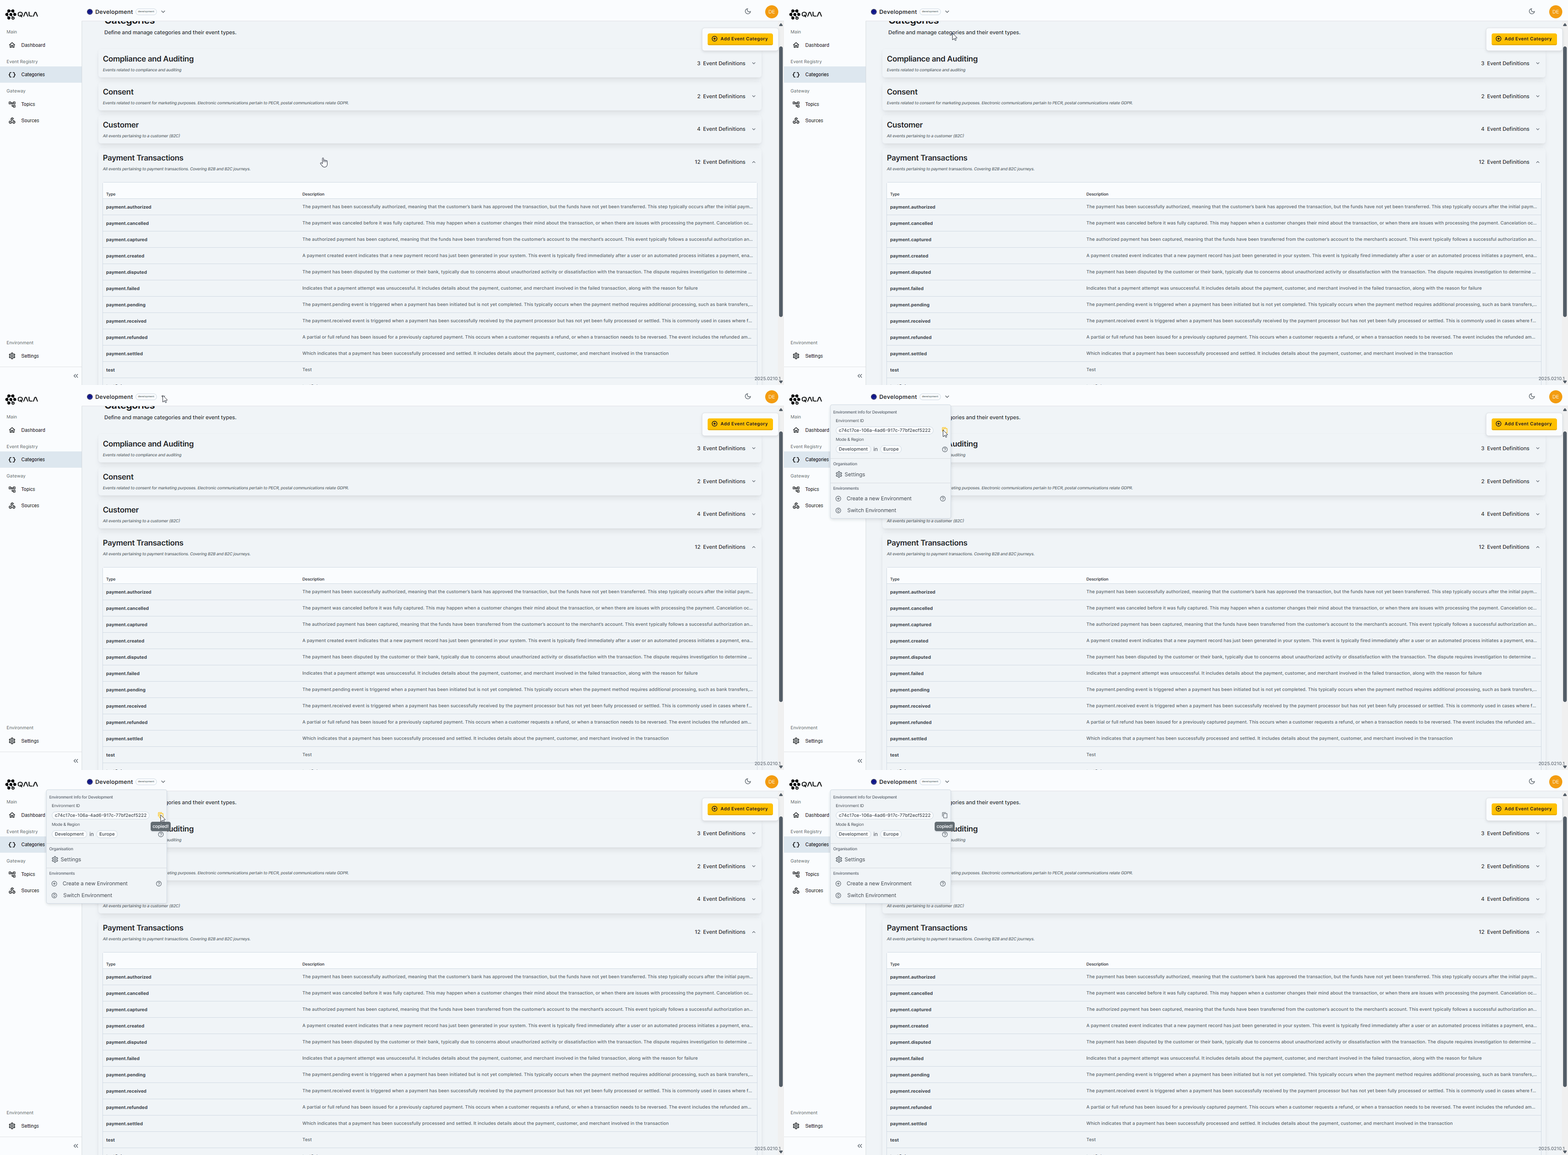
How to Copy the Environment ID:
- Open the Management Portal.
- Press the Environment Name on the top menu.
- Press the copy icon adjcent the Enviornment ID.
- The Enviornment ID will be copied to your clipboard.
All requests to publish an event must have the environment ID on the x-environment-id header, and set x-auth-token header using the
Create an API Key
An Event will only be published to the Topic if the type is a valid Event Type within the Event Registry. If you have an Event where it’s not defined in the Event Registry, or if the event is not associated with a Topic, you will receive a 400 bad request.
An array of events can be sent using the /v1/topics/{{topicname}}/events/publish endpoint.
| type required | string non-empty ^(?:[A-Za-z0-9.,_\-&()\[\]<>]{1,100})$ The type of the Event. |
| id | string or null The Id of the Event. |
| audiences | Array of strings or null Route the Events to the specified scoped audience. |
| data required | string non-empty The data of the Event. |
{- "type": "string",
- "id": "string",
- "audiences": [
- "string"
], - "data": "string"
}Publish Events to an Enviornment
The Q-Flow Publishing Events Endpoint allows you to publish one or more events without specifying a Topic in the API request. Instead, Q-Flow dynamically routes each event to the appropriate Topics and Subscriptions based on:
- Event Type Matching: Events are routed to Topics where the event type matches one that has been explicitly defined by the Publisher. From there, they are delivered to Subscriptions that are actively listening for those event types.
- Audience Matching: Within those Subscriptions, Q-Flow applies the Subscription Scope Filter (if present) to ensure that only events with a matching audience are delivered.
An array of events can be sent using the /v1/events/publish endpoint. This simplifies your publishing logic, reduces the risk of misrouted events, and supports secure, multi-tenant event delivery.
Key Behavior
✅ No Topic Required: Events are published without referencing a specific Topic.
🧠 Smart Routing: Q-Flow automatically routes events to all Topics where the event type is defined.
🔐 Scope Filtering: Subscriptions only receive events where the audience matches their Scope Filter.
📏 Schema Validation: Events are validated against the environment’s schema before processing (if enabled).
❌ Invalid events (e.g., unregistered event types or schema mismatches) are rejected with a 400 Bad Request.
Example: Routing Logic
{
    "type": "payment.authorized",
    "audiences": [
        "ACME01"
    ],
    "data": {
        "transactionId": "987654321",
        "paymentMethod": {
            "type": "credit_card",
            "last4": "4242",
            "brand": "Visa"
        },
        "amount": {
            "currency": "USD",
            "value": 600.00
        },
        "status": "authorized",
        "authorizedAt": "2025-02-07T12:34:56Z"
    }
}
Routing outcomes:
- ✅ Routed to Topics where payment.success is a defined event type.
- ✅ Delivered to Subscriptions with a Scope Filter of "ACME01".
- ❌ Not delivered to Subscriptions without a matching event type or audience.
Important Notes
- Events that do not match any Topic's event type are discarded.
- Subscriptions with no Scope Filter receive all events matching their Topic and query, regardless of audience.
- Subscriptions created via the Embeddable Component will inherit the Scope from their Subscriber Group and cannot override it. For more information, check the Subscriber Scope Filter (Embeddable Component) section.
Benefits
- Simplified integration: One endpoint for all events—no need to manage multiple URLs per Topic.
- Reduced risk of errors: Event type and audience filters ensure correct delivery.
- Built-in validation: Prevents malformed or unauthorized events from being processed.
- Supports multi-tenancy: Ensures strict data isolation via audience-based filtering.