Step-by-Step Guide to Using Q-Flow Sources
Posted on the 4th of March, 2025

Overview
Effortlessly receive and manage webhooks from external services with a quick, one-time setup and no ongoing maintenance.
Q-Flow Sources simplifies event management at scale by centralising event ingestion, routing, and authentication into one intuitive platform. Built-in fault tolerance ensures no event slips through the cracks, while advanced filtering and aggregation let you focus on the events that truly matter.

What It Is
With Q-Flow Sources, Q-Flow can receive events from third-party services and act as a central event gateway. By centralising event ingestion, routing, and authentication into a single, intuitive platform, Q-Flow eliminates the chaos of managing disparate webhook streams, ensuring you never miss a critical event again.
Why It Matters:
- Centralized Control: Stream all your inbound events through Q-Flow, reducing complexity and simplifying your infrastructure.
- Fine-Grained Filtering: Subscribe only to the events you need, helping you comply with data protection regulations and minimize payload processing.
- Compliance & Security: Restrict which HTTP methods are allowed (e.g., only POST or PUT), define IP whitelists (IP addresses, ranges, CIDR), and leverage Basic, API Key, or JWT-based authentication to ensure only valid requests make it through.
Process Requests from Third-Party Services in a matter of minutes! Follow the Guide below to get started.
Step-by-Step guide
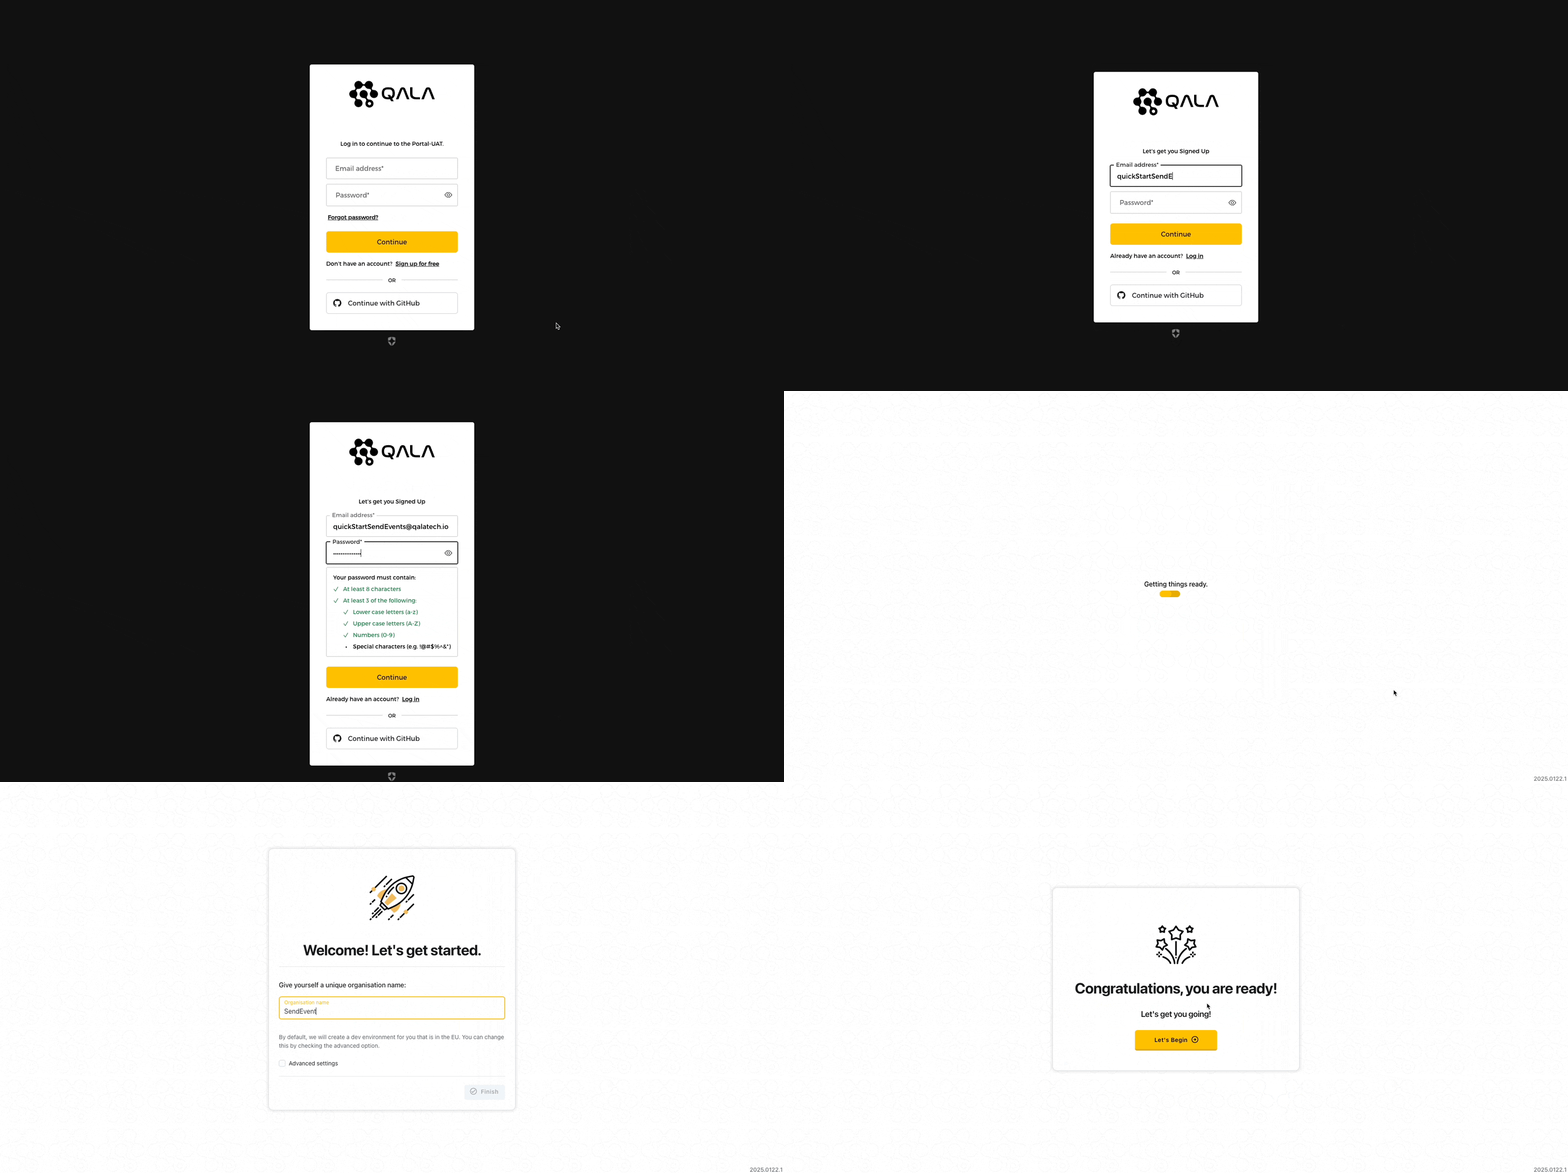
Step 1: Sign Up for a Free Account
- Sign Up: Click here to Sign Up for Free using your email address or GitHub account.
- Name Your Organization: Provide a unique organization name and choose your region.
- Set Up Your Environment: By default, you’ll have a development environment that is ideal for testing before moving into production.

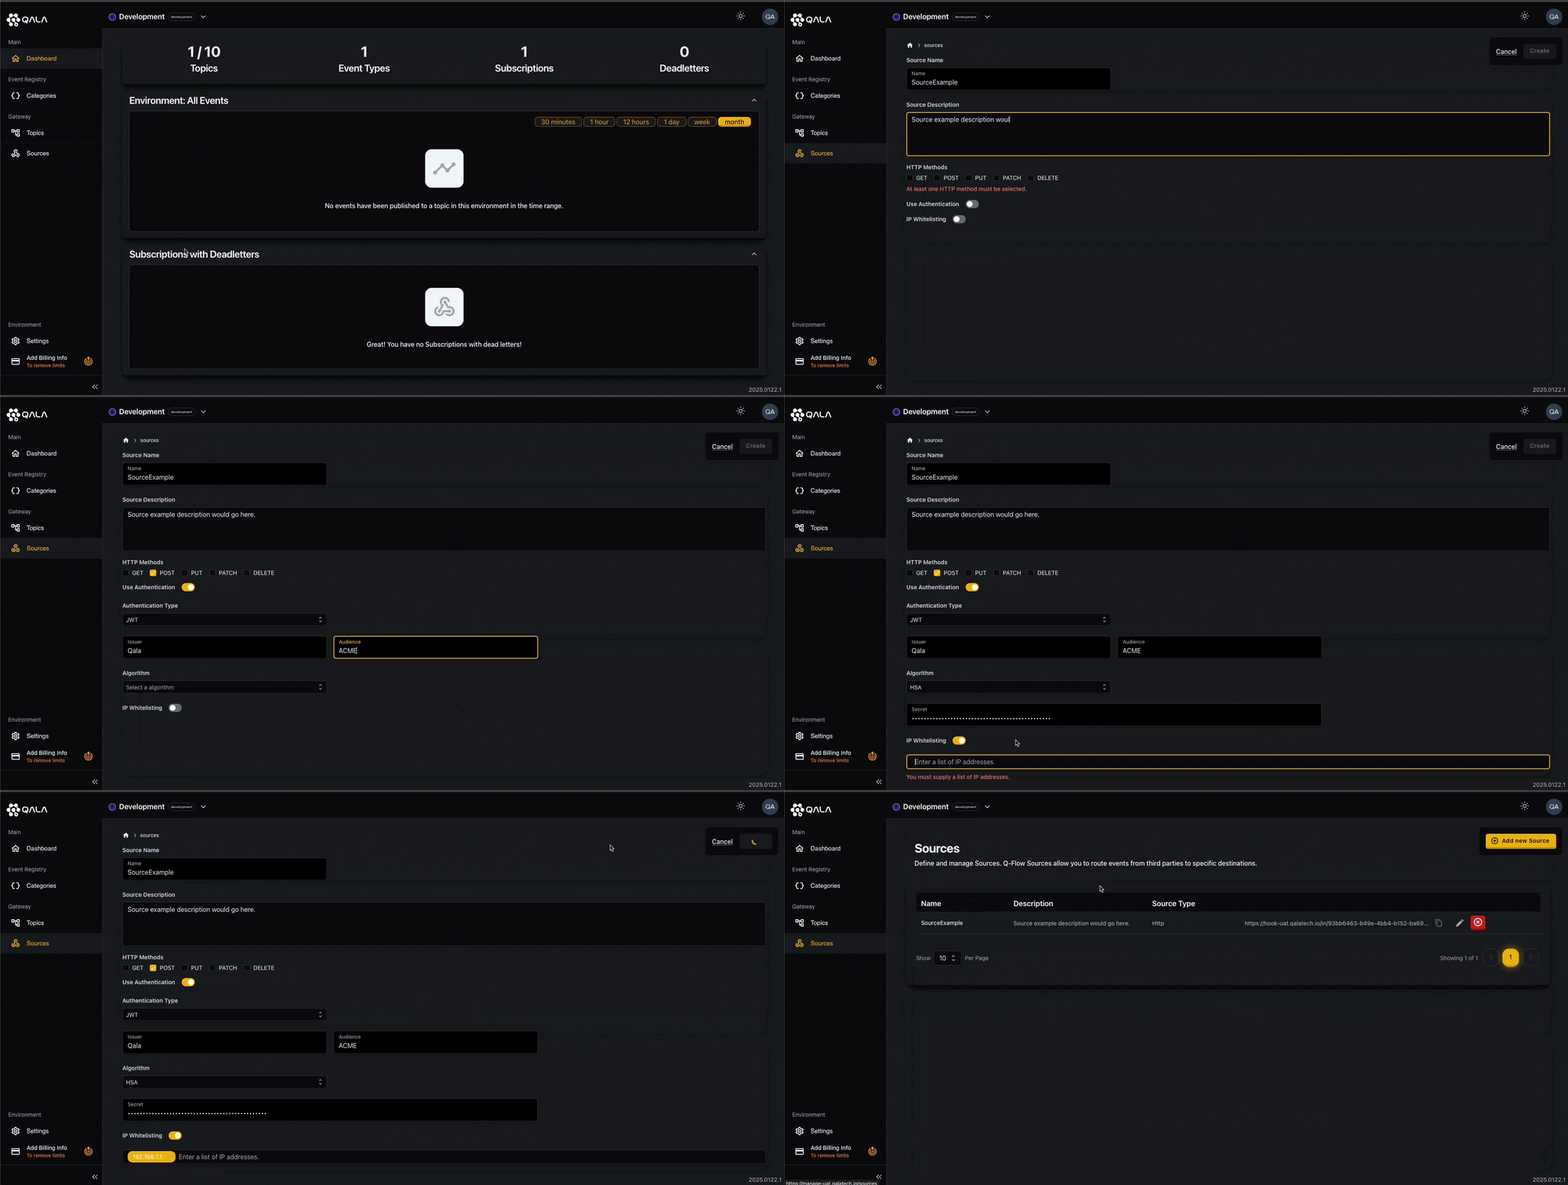
Step 2: Create a Q-Flow Source
A Source is the entry point for any external service or application sending requests or events. Here’s how to set one up:
- In the Management Portal, navigate to Sources on the left sidebar.
- Click "Add New Source".
- Provide a unique name (across both Topics and Sources) and a description.
- Select one or more HTTP methods (e.g., POST, GET) you’ll accept.
- (Optional) Configure authentication details (e.g., Basic Auth, API Key, or JWT).
- (Optional) Apply IP whitelisting using IP addresses, ranges, or CIDR.
- Click Create.

Here’s a sample JSON payload you might receive from a third-party service:
1{2 "id": "evt_1NzqHd2eZvKYlo2C1e6QJF1Y",3 "object": "event",4 "api_version": "2024-03-01",5 "created": 1709564723,6 "data": {7 "object": {8 "id": "pi_3NzqHd2eZvKYlo2C0cTCXy5M",9 "object": "payment_intent",10 "amount": 2000,11 "currency": "usd",12 "status": "succeeded",13 "charges": {14 "object": "list",15 "data": [16 {17 "id": "ch_3NzqHd2eZvKYlo2C1T0yTpoL",18 "object": "charge",19 "amount": 2000,20 "currency": "usd",21 "paid": true,22 "payment_method": "pm_1NzqHc2eZvKYlo2CeqKbdrqY"23 }24 ]25 }26 }27 },28 "livemode": false,29 "pending_webhooks": 1,30 "type": "payment_intent.succeeded"31}
Once created, Q-Flow provides a secure endpoint (URL) you can share with your providers (e.g., GitHub, Stripe). Any request matching your chosen HTTP methods, authentication, and IP rules will flow into Q-Flow seamlessly.
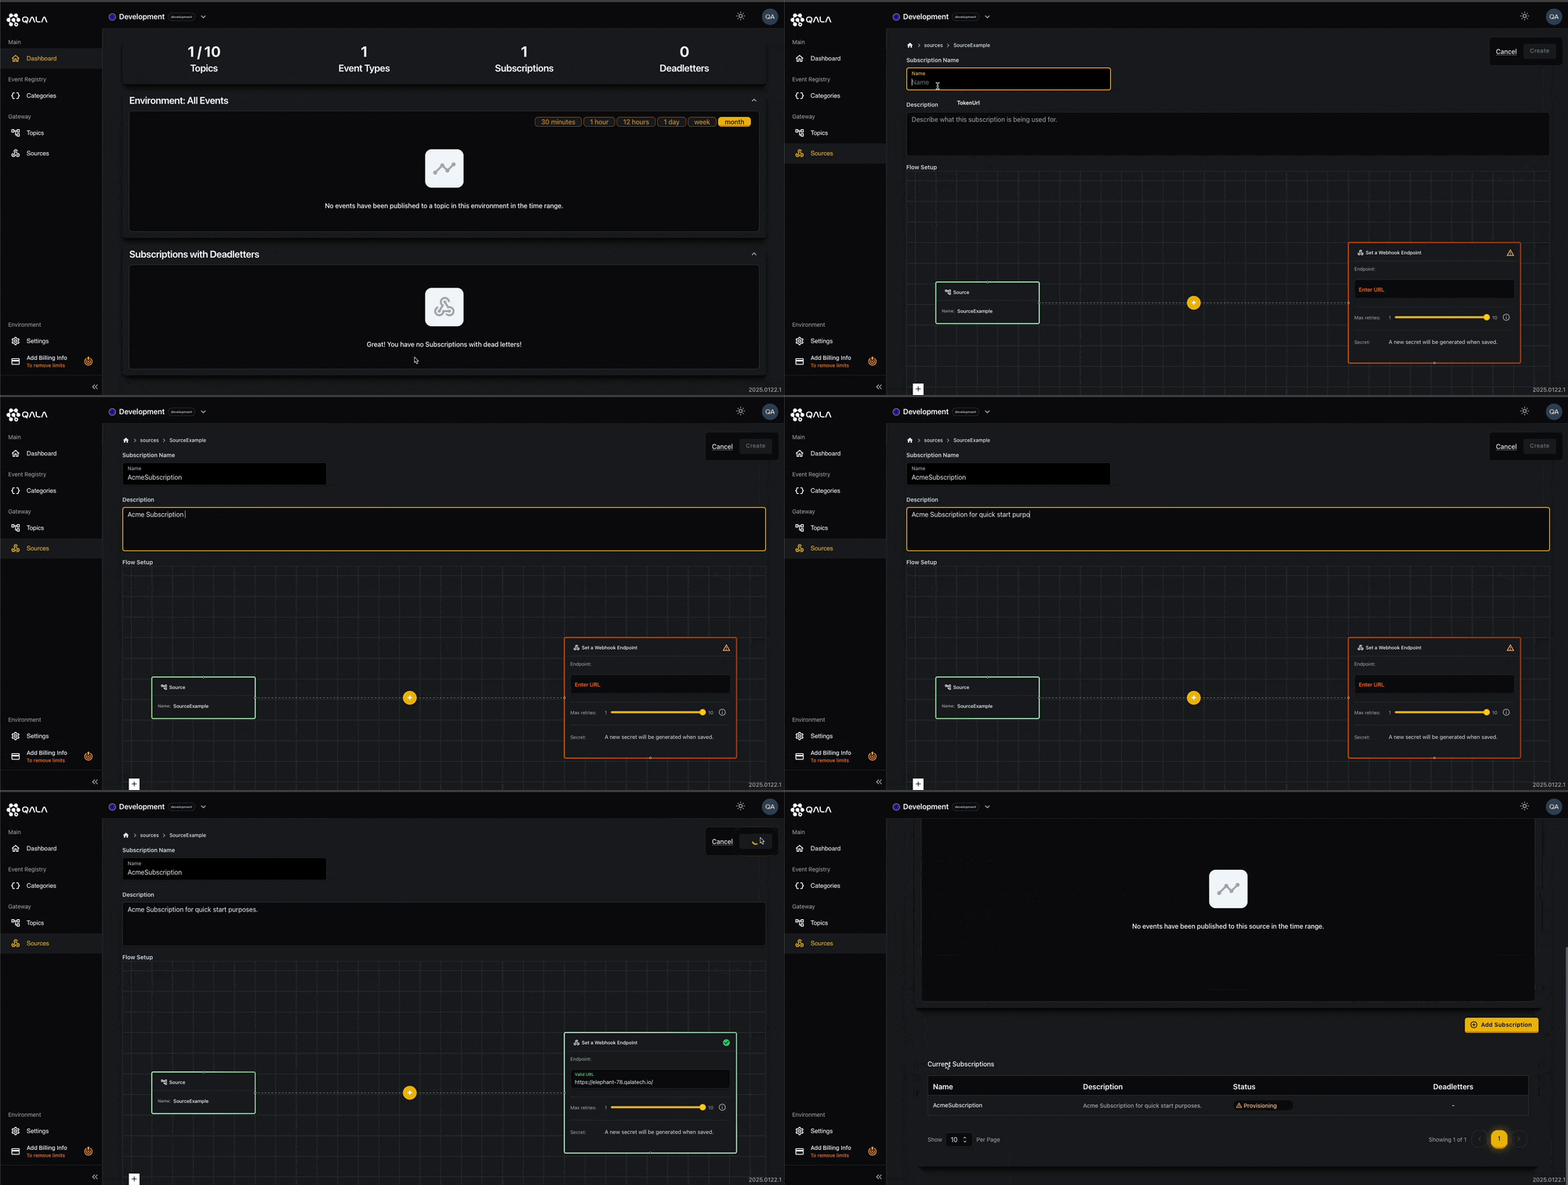
Step 3: Add a Subscription to Your Source
Now that you have a Source set up, it’s time to create a Subscription that defines which events you’re interested in and where to route them.
- Open the Source you created in Step 2.
- Click Add Subscription.
- Give your Subscription a unique name and a description.
- (Optional) Enable Advanced Filtering, Aggregation, or Transformation.:
- Click the Plus (+) icon next to the endpoint destination.
- In the Advanced Query modal, add a sample JSON event under Input.
- Write your SQL query to filter or transform the data.
- Test your filter to verify the output, then click Save. - Set a Webhook Endpoint URL to define where Q-Flow should forward these events.
- Configure maximum retries for the webhook. Q-Flow will use exponential back-off to retry deliveries if an endpoint is temporarily unavailable.
- Click Create.
Example SQL of using the Q-Flow Advance Query
1SELECT2 customer.id,3 UPPER (customer.name) AS customer_name4FROM events5WHERE event_type = 'order_created'
Here, we're selecting the customer.id and the uppercase version of customer.name only for order_created events.
Pro Tip: After creating the Subscription, you’ll see a Subscription Webhook Secret. Use this to verify the authenticity of events. Check out Q-Flow’s Webhook Signatures documentation for more info.

Why Q-Flow Sources?
- Guaranteed Delivery: Exponential retries, dead-letter queues, and replay ensure no event is lost.
- Simplified Setup: One-time, centralized configuration via an intuitive UI, REST APIs, or CLI.
- Scalable Architecture: Easily add more event sources or handle heavier traffic without major re-engineering.
That’s it! You’re now set up to receive, filter, and route incoming requests through Q-Flow Sources. Whether you’re consolidating data streams or orchestrating microservices, Q-Flow provides the backbone for reliable, scalable event routing.
Get Started
Ready to give it a try? Sign up for a free Q-Flow account to unlock all the features at no cost. If you get stuck or have any questions, explore the Q-Flow documentation or join our community forum.
Q-Flow Loom Video: https://www.loom.com/share/b4dae82041bb47edadb18b22e86fc508?sid=da4c1323-6d43-4ec9-b1ba-0db4d2ef4d6e

