Guide to Implementing Webhooks in Qala
Posted on the 20th of February, 2025
Introduction
So, you’ve heard that Qala makes webhook management super simple—but where do you start? In this post, we’ll walk you through the basics: from creating your first Category and Event Type, to testing your webhook connections and publishing your events. Let’s jump right in!
1. Set Up Your Qala Account
First things first: sign up for a free Qala account.
- You can use your email address or GitHub for single sign-on.
- During setup, name your Organisation, choose your region, and you’ll get a Development environment to practice in.
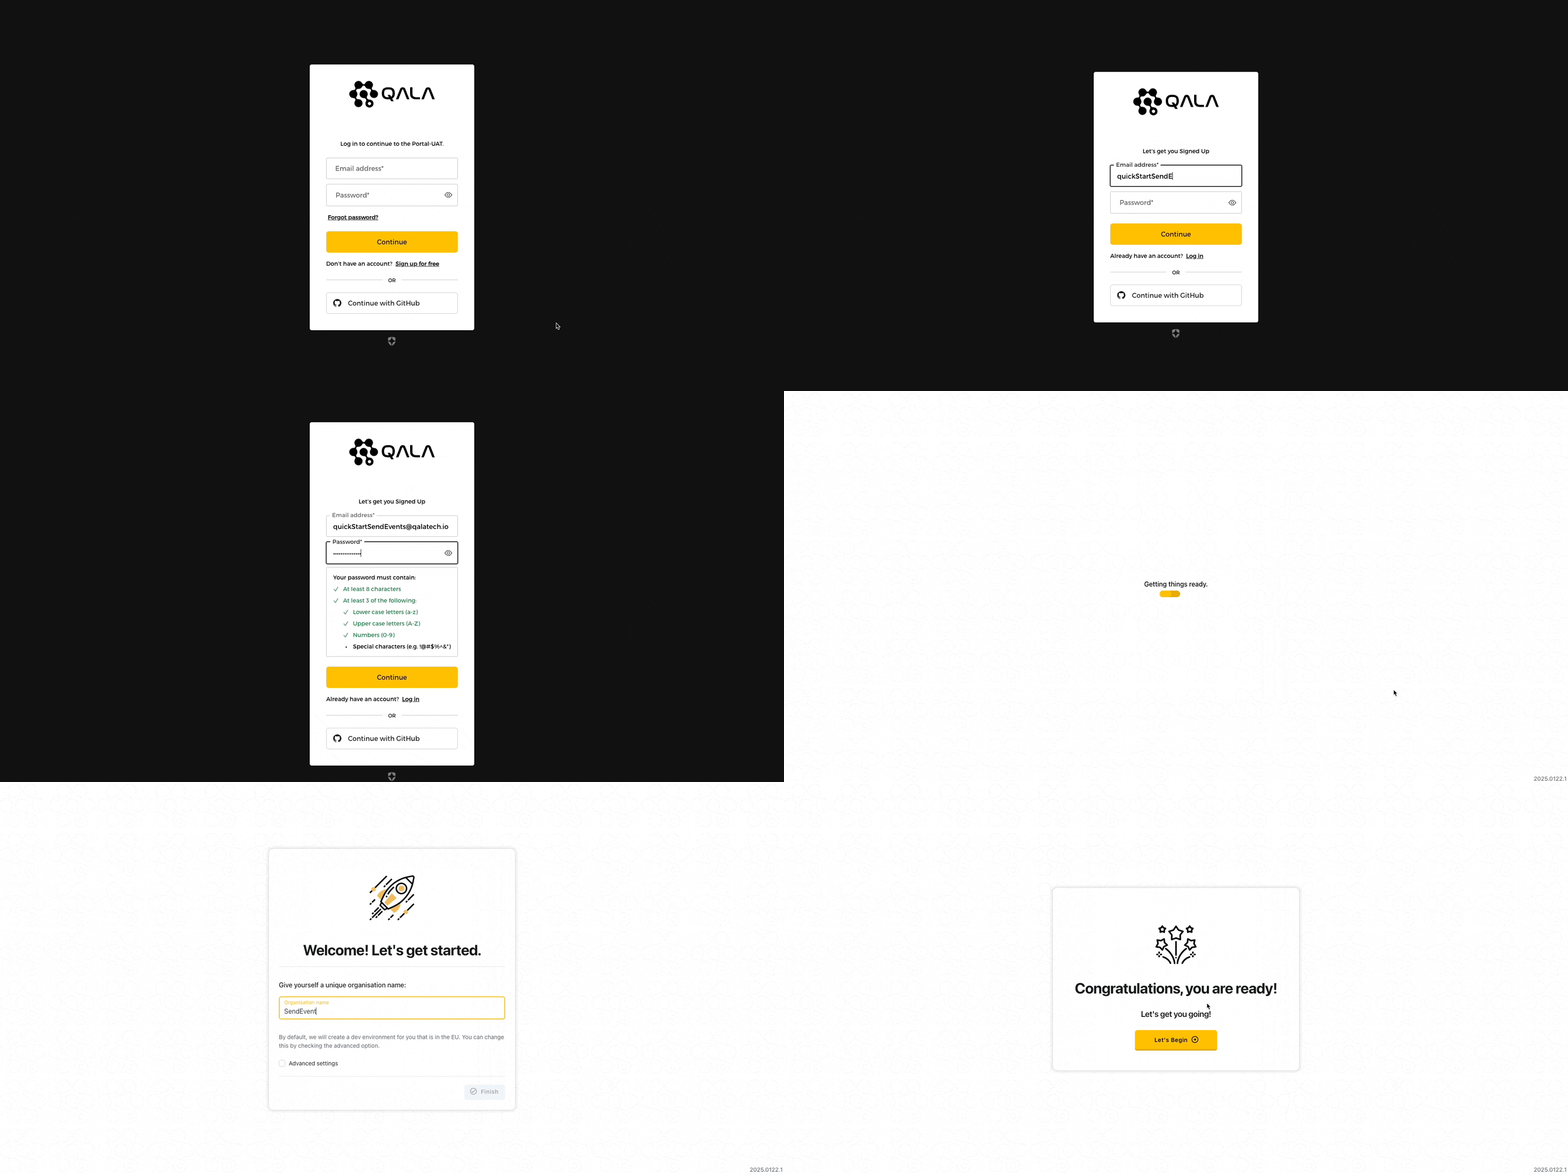
Tip: Don’t overthink it-you can always create additional environments later to separate staging, production, or specialised testing.
2. Create Your First Category and Event Type
Now, let’s define the events you’re interested in. Since we’re focusing on payments in this example, let’s set up a Category and Event Types that fit typical payment flows.
Create a Category
A Category is essentially a grouping for your Event Types.
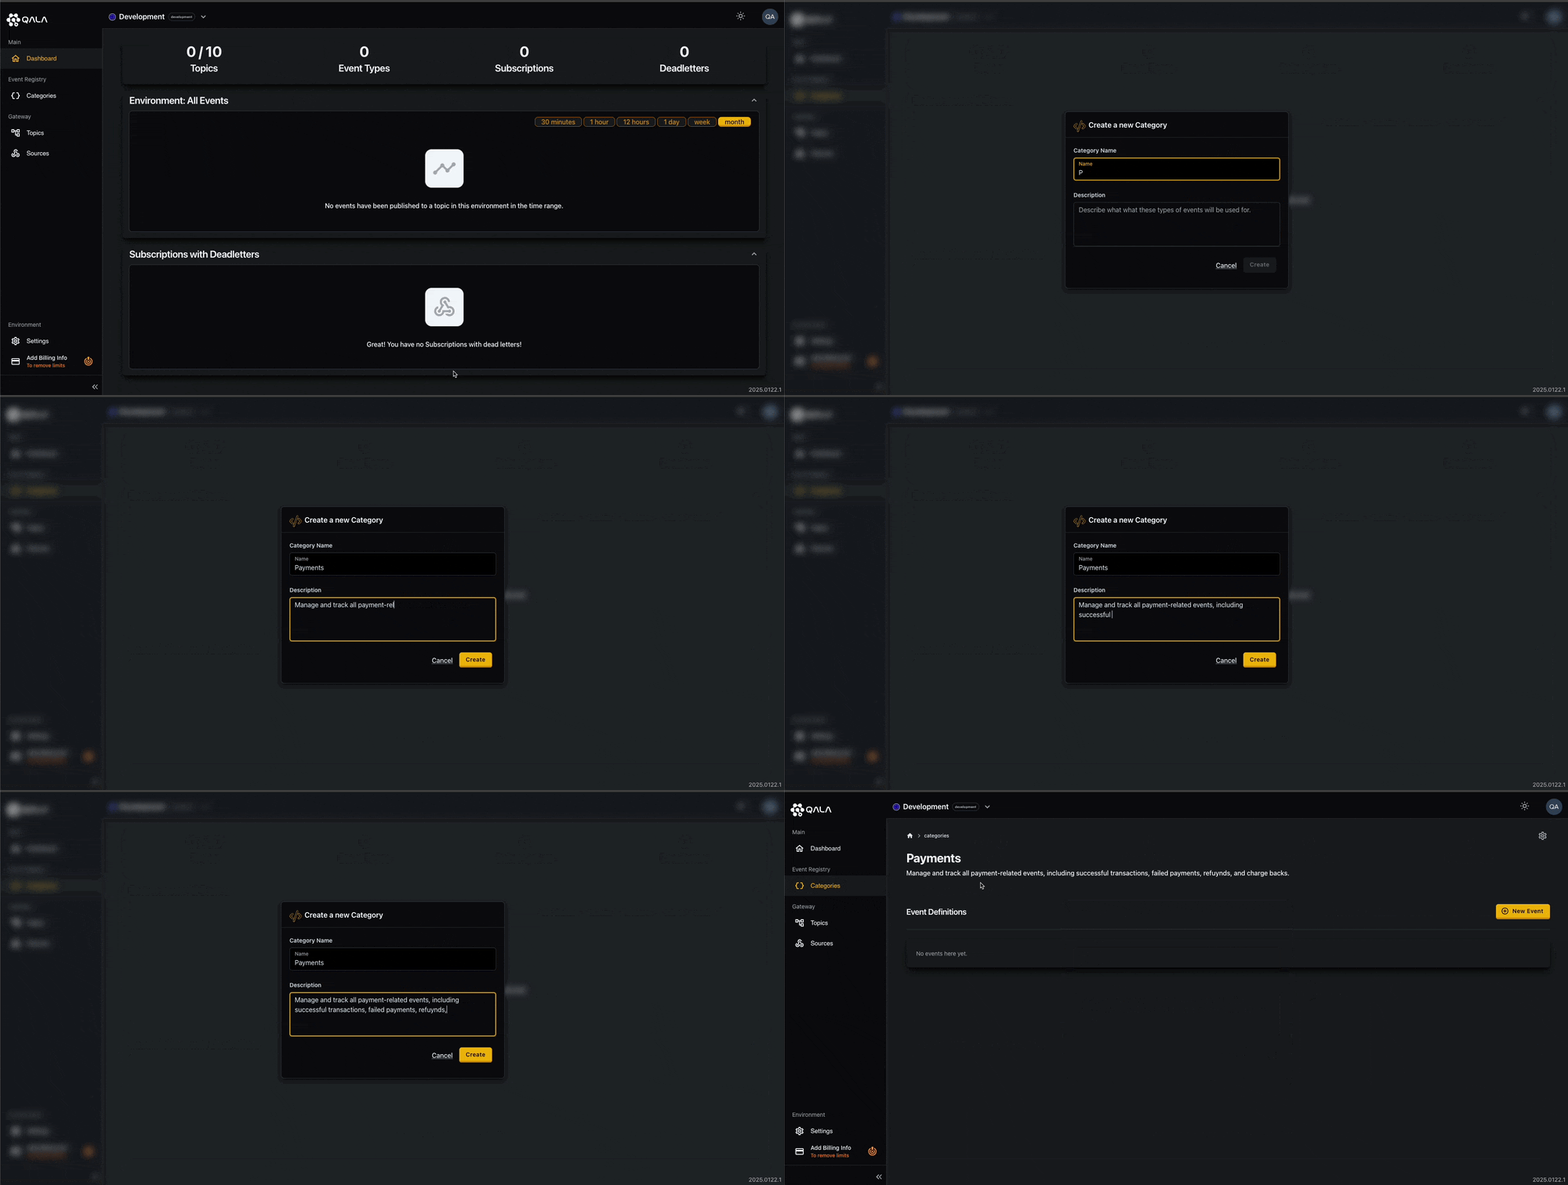
- Go to the Management Portal.
- Select Categories from the left sidebar.
- Click Add Event Category.
- Enter a unique name—e.g., payments.
- Add a description (e.g., “All payment-related events for our e-commerce app”).
- Click Create.
Create an Event Type
Inside your new Category, you’ll define events like payment.created, payment.succeeded, or payment.refunded.
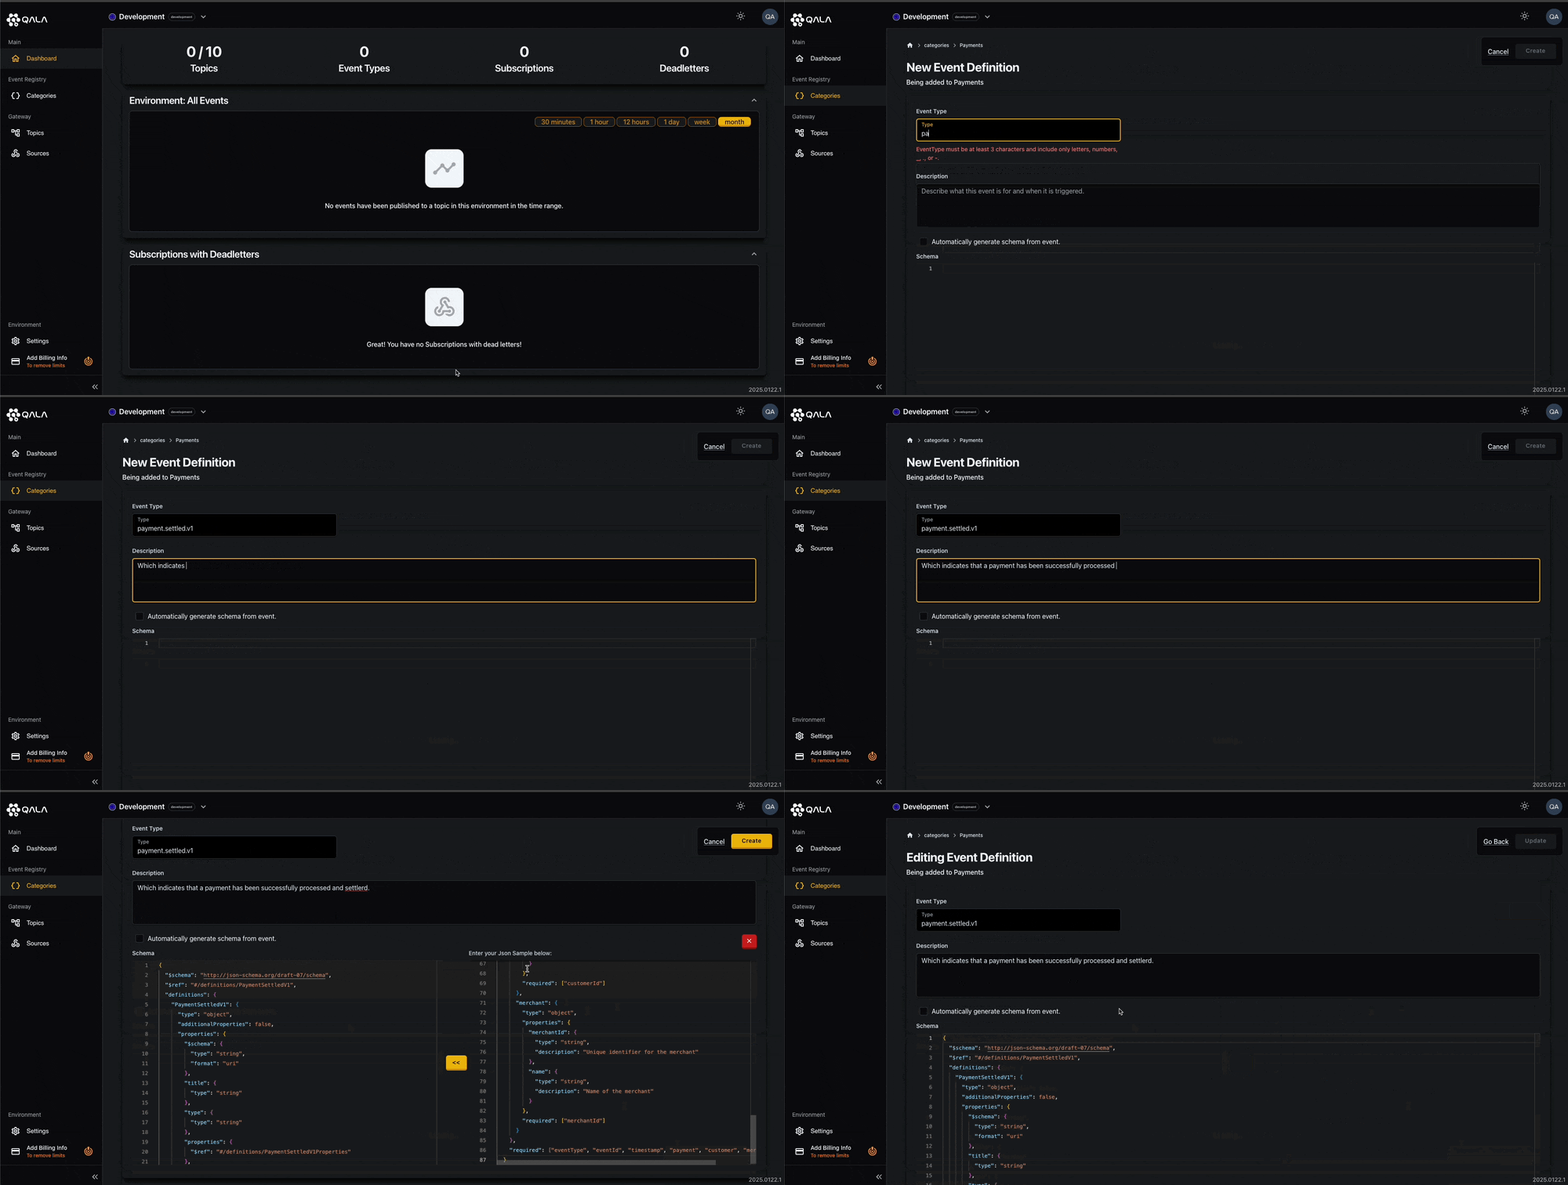
- Be sure you’re inside your newly created payments Category.
- Click New Event.
- Name your Event Type, e.g., payment.created.
- Add a brief description.
- Define the schema or let Qala generate one automatically from JSON. Feel free to use the ‘Generate from JSON’ quick action to define a schema.
- Click Create.
Here’s a JSON example for Payment created to copy and paste for convenience: -
1{2 "id": "pay_98765xyz",3 "status": "pending",4 "amount": 5000,5 "currency": "USD",6 "payment_method": "credit_card",7 "description": "Order #1234",8 "created_at": 1673568000,9 "customer": {10 "id": "cus_1010101",11 "email": "Examplecustomer@qalatech.io",12 "name": "Jane Doe"13 }14}
Hint: Using a naming convention like noun.verb keeps things straightforward—e.g., payment.created, payment.failed, invoice.paid. Its also good practice to also include versioning within the name, like payment.createdV1. For more information on Well-defined Webhook Events, see our previous Article here.
3. Create Your First Topic
A Topic lets you group together related Event Types, so subscribers only receive updates on what truly matters to them. Think of it as a channel for specific events—whether it covers a single company, multiple categories, or just a particular subject area. This setup helps reduce unnecessary data noise and addresses regulatory concerns by keeping notifications focused and relevant.
For payments, for example, you could create a Topic that follows the entire payment lifecycle—from creation all the way to completion—ensuring finance or analytics teams only see the events they need.
- In the Management Portal, select Topics in the sidebar.
- Click Add new Topic.
- Give your Topic a name—e.g., payment-lifecycle—and a short description.
- Select the payment-related Event Types (e.g. payment.created, payment.failed, payment.settled) that belong to this Topic. This list is populated from the Event Registry for the Environment.
- Press Create.
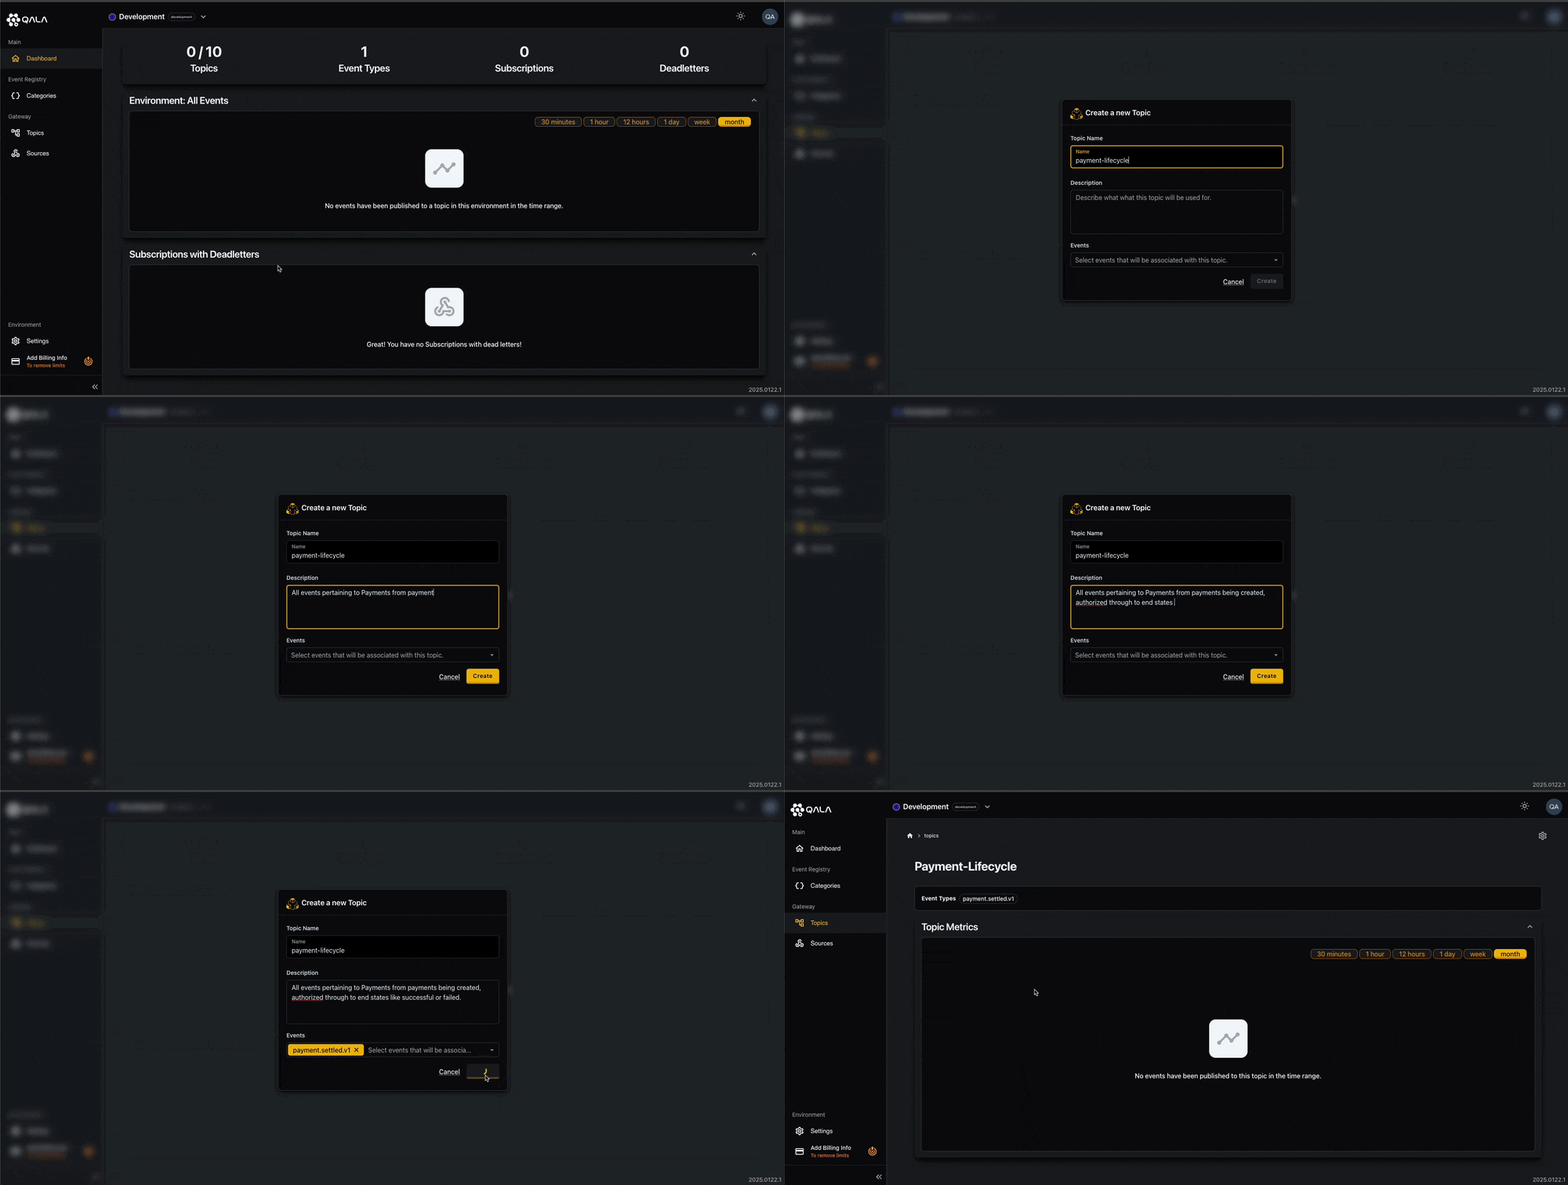
Use Case Example (Payments): A payment-lifecycle Topic could include everything from payment creation, authorised, settled, failure, and refund events.
4. Create Your First Subscription
A Subscription connects your Topic to an actual webhook endpoint—so your system can react to payment events in real time. A Topic can have many Subscriptions.
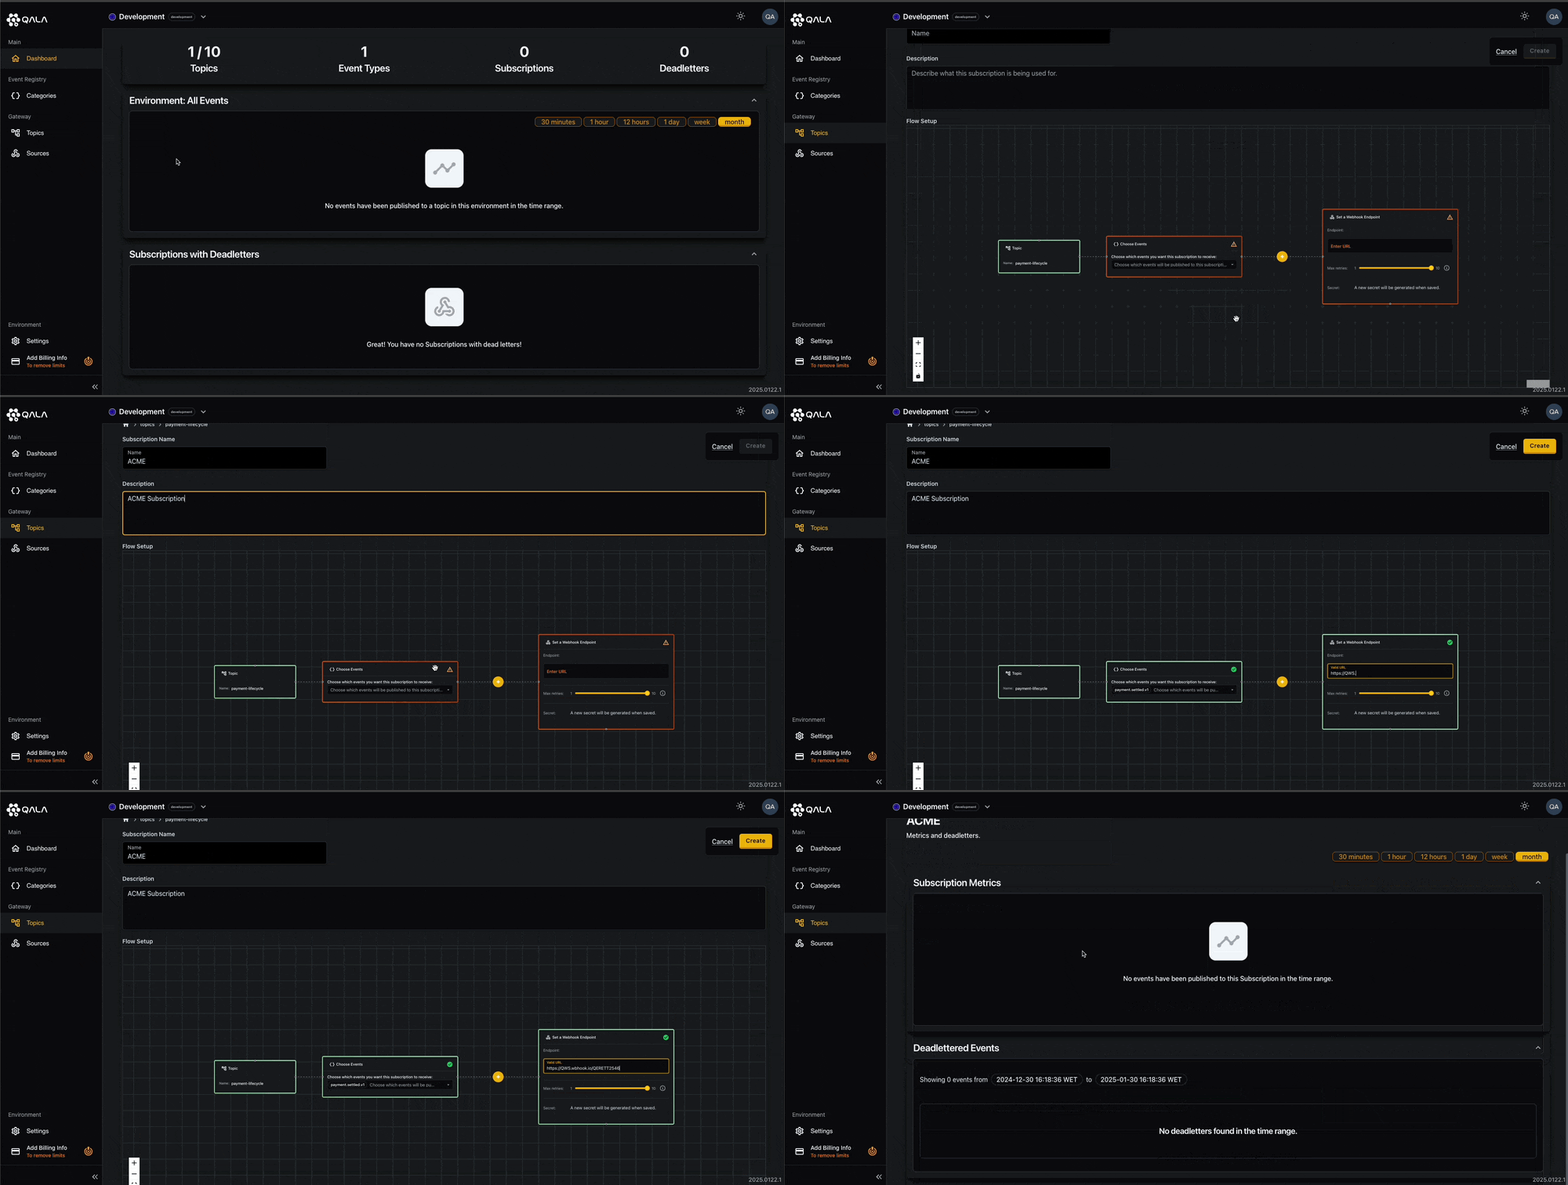
- Navigate to your newly created Topic (e.g., payment-lifecycle).
- Click Add Subscription(bottom of the page).
- Give the Subscription a name (e.g. FinanceTeamWebhook) and add a description.
- Select which events under this Topic you want to receive. (For instance, maybe you only want notifications on payment.succeeded for your success metrics dashboard). This allows you to choose which events are important and you can only select events available to the Topic for privacy and compliance purposes.
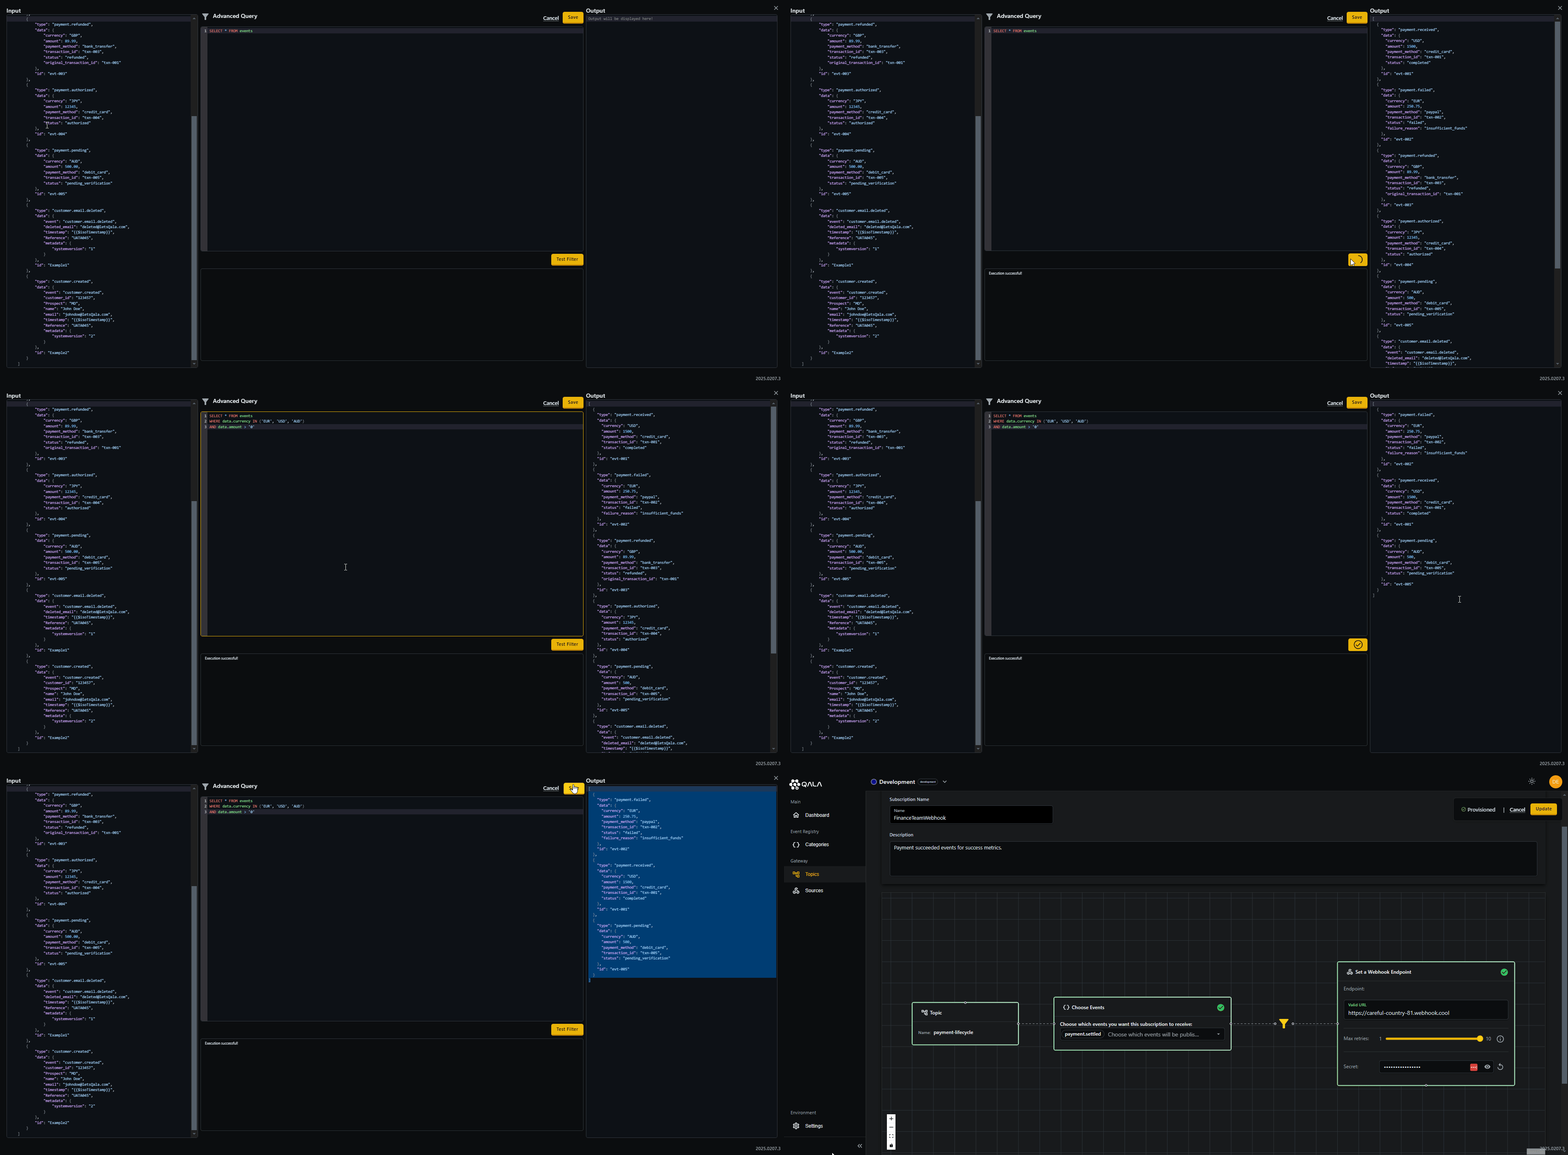
- If needed, apply advanced filtering or transformations using Q-Flow’s Advanced Query. View our example use-cases here for some ideas on how to leverage the Advance Query functionality.
- Set a webhook endpoint URL—the address where Qala sends the events.
- Configure retry attempts (helpful for handling transient network errors).
- Click Create.
Pro Tip: Use Advanced Query to filter out events you don’t need. For example, skip free orders and only forward paid subscriptions to your analytics system where the Currency is Euros, United States Dollar or Australian Dollar.
1SELECT * FROM events2WHERE data.currency IN ('EUR', 'USD', 'AUD')3AND data.amount > '0'
5. Send a Test Event
Time to see everything in action! It really is that easy!
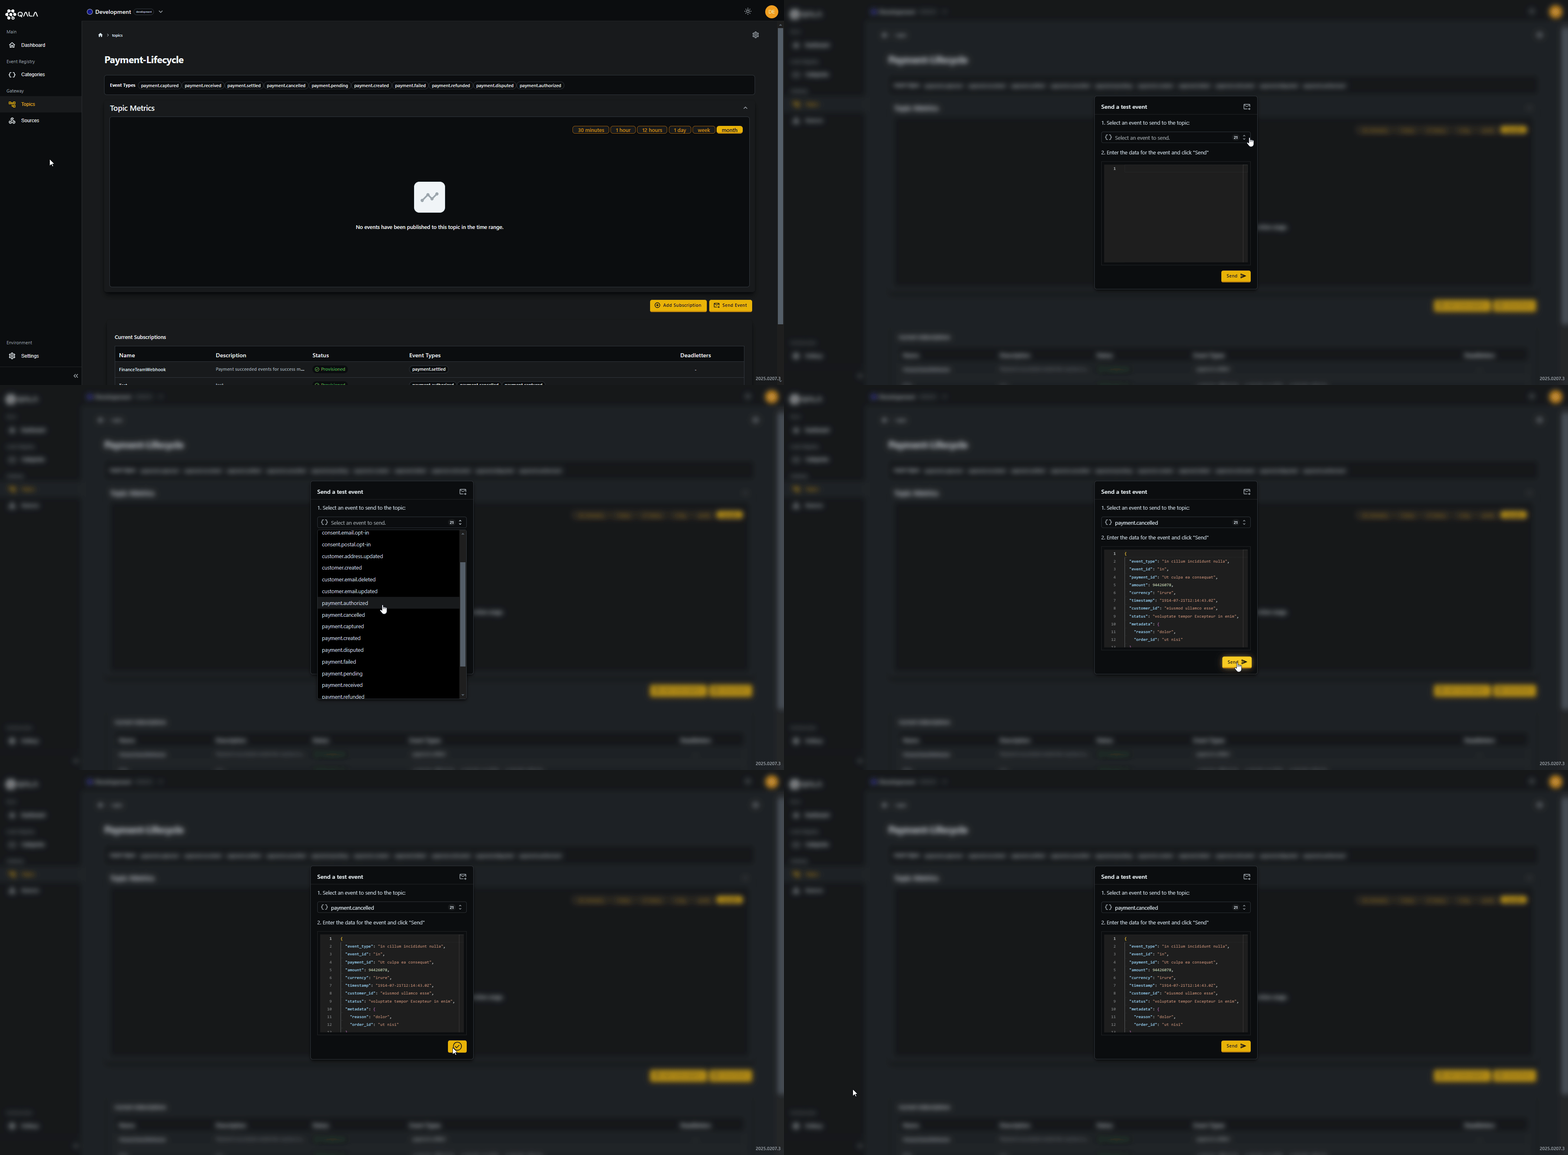
- Go to your Topic (e.g., payment-lifecycle).
- Click Send Event (above your newly created Subscription for the Topic).
- From the drop-down, pick one of your payment-related Event Types (e.g., payment.created). Ensure you select an event that’s available for the Subscription. If you choose an event from the Topic that isn’t selected on the Subscription, Qala will correctly filter these events out.
- Press Send.
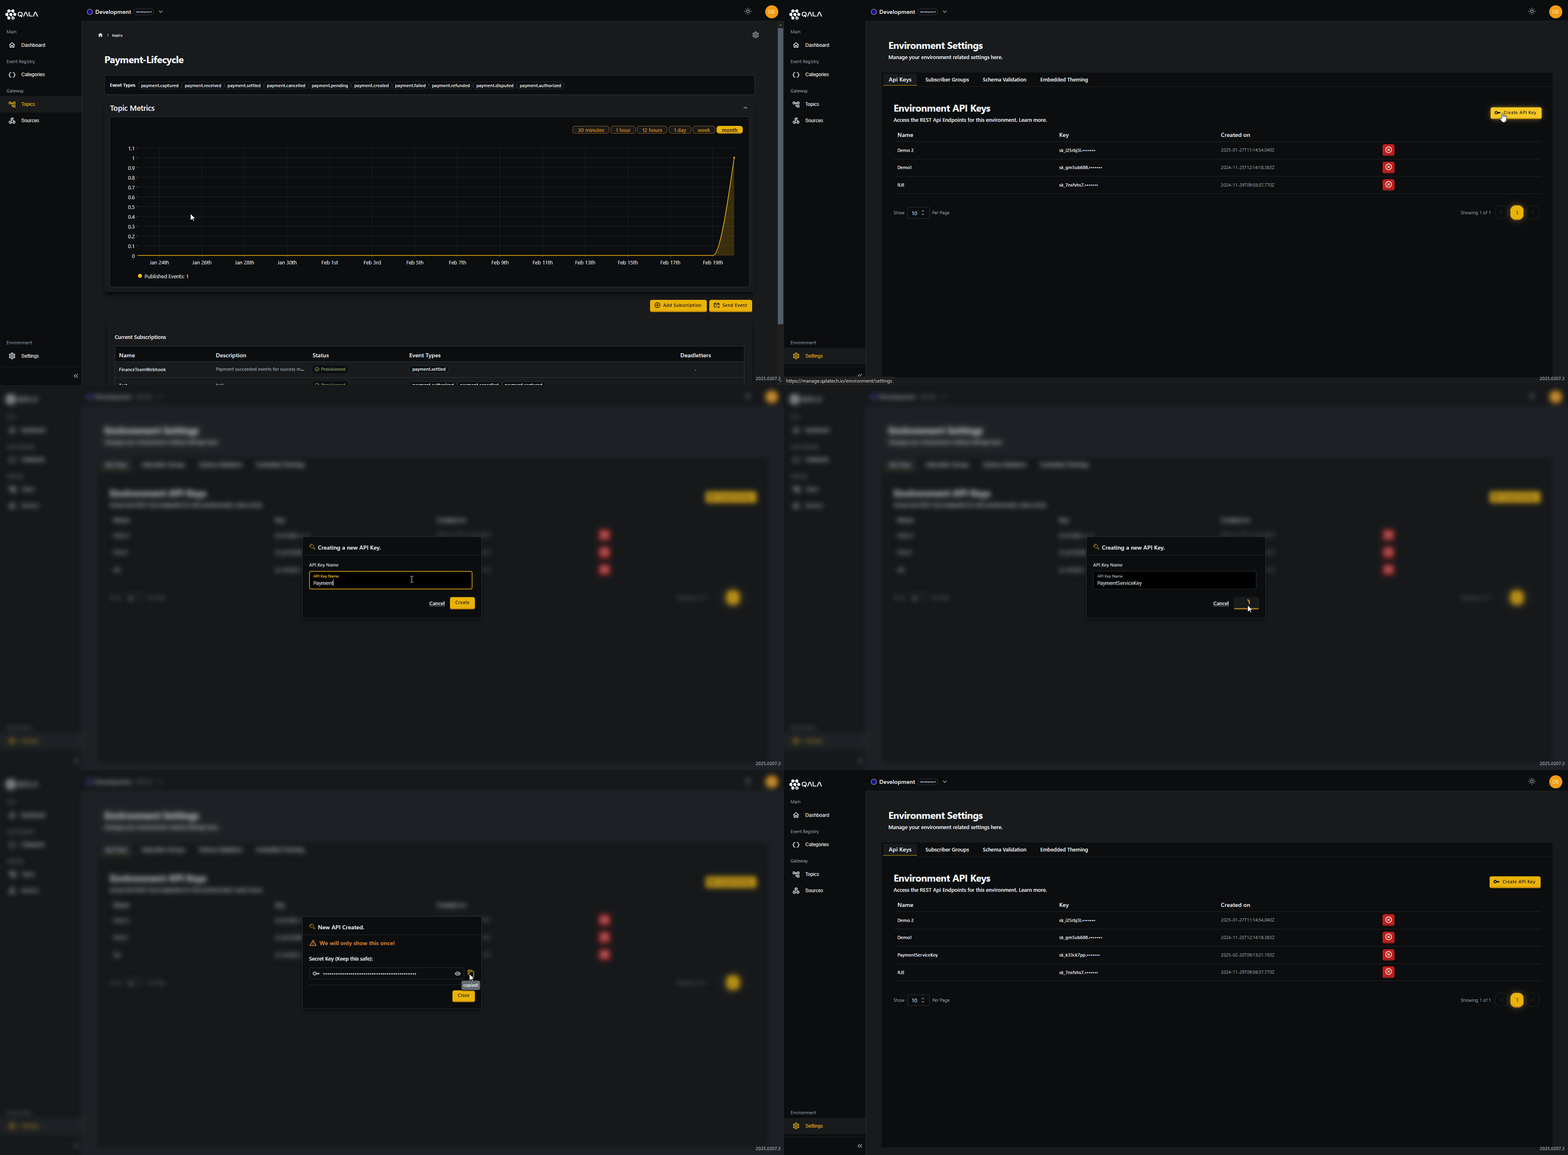
6. Create an API Key
To publish events programmatically, you’ll need an Environment API key.
- Go to Settings in the Management Portal.
- Click Create API Key.
- Give your key a name—e.g., PaymentServiceKey.
- Click Create.
- Now copy your Secret Key.
Warning: Qala only shows the Secret Key once, so keep it in a secure place. If you lose it, you’ll have to regenerate a new one.
7. Publish a Payment Event to Your Topic
Ready to integrate with your own code or payment gateway? You’ll need two headers when you call Qala’s Publish API:
- x-environment-id: <YOUR_ENV_ID>
- x-auth-token: <YOUR_SECRET_KEY>
You can get your Environment ID by clicking your environment name in the Qala portal.
Then, just make a POST request using the Topic Name in the request: https://publisher-api.qalatech.io/v1/topics/{{Topic}}/events/publish
Publish API Specifications can be found here or fork our Postman collection here.
Wrapping Up
That’s it! You’ve successfully set up a complete payment webhook flow with Qala.
Remember, Qala’s advanced features let you filter, transform, and aggregate events for deeper customisation—handy when working with large amounts of data. So go ahead, experiment with multiple Topics, apply filters, and automate those workflows.
In addition, Qala offers even more benefits to elevate your event-driven architecture:
- Define, Detect & Protect from Breaking Changes
Catalog and manage events effortlessly, with insights into usage, change impact, and safeguards. - From Frontend to Backend, We’ve Got You Covered
Embeddable, low to no-code components make integration effortless across the stack. Enable seamless functionality from frontend to backend, empowering teams to build and deploy faster without added complexity. - Guaranteed Delivery
With built-in retries and failover mechanisms, Qala ensures your events always reach their destinations. - Retries and Deadletters
Our Reliable Delivery feature uses exponential backoff to retry failed events. Unresolved events go into deadletter storage for safe review and replay, so every event is eventually processed without overwhelming your system.
Happy building, and welcome to the world of event-driven integrations with Qala!
Book a demo today!
